How to Create Discounts on Shopify
(Step-by-Step Guide)
Creating discounts in Shopify is one of the easiest ways to boost conversions, clear inventory, and reward loyal customers. In this beginner-friendly tutorial, we’ll walk through how to create discounts on Shopify, explain the different discount types, and share best practices so you avoid common mistakes.
What You'll Learn in This Guide
-
Types of discounts available in Shopify
-
How to create a discount code
-
How to create an automatic discount
-
When to use product discounts vs order discounts
-
Common mistakes to avoid
This guide is suitable for Shopify beginners and store owners managing promotions for the first time.
Types of Discounts in Shopify
- 1. Amount off products
- Discount specific products or collections
- Can be percentage-based (e.g. 15% off) or fixed amount (e.g. $10 off)
- Ideal for sales on selected items - 2. Buy X Get Y
- Customers buy a certain quantity and get another item discounted or free
- Perfect for bundles and upselling - 3. Amount off order
- Applies to the entire order total
- Commonly used for voucher codes (e.g. $20 OFF) - 4. Free shipping
- Removes shipping fees based on conditions
- Great for reducing cart abandonment
Step-by-Step: How to Create a Discount on Shopify
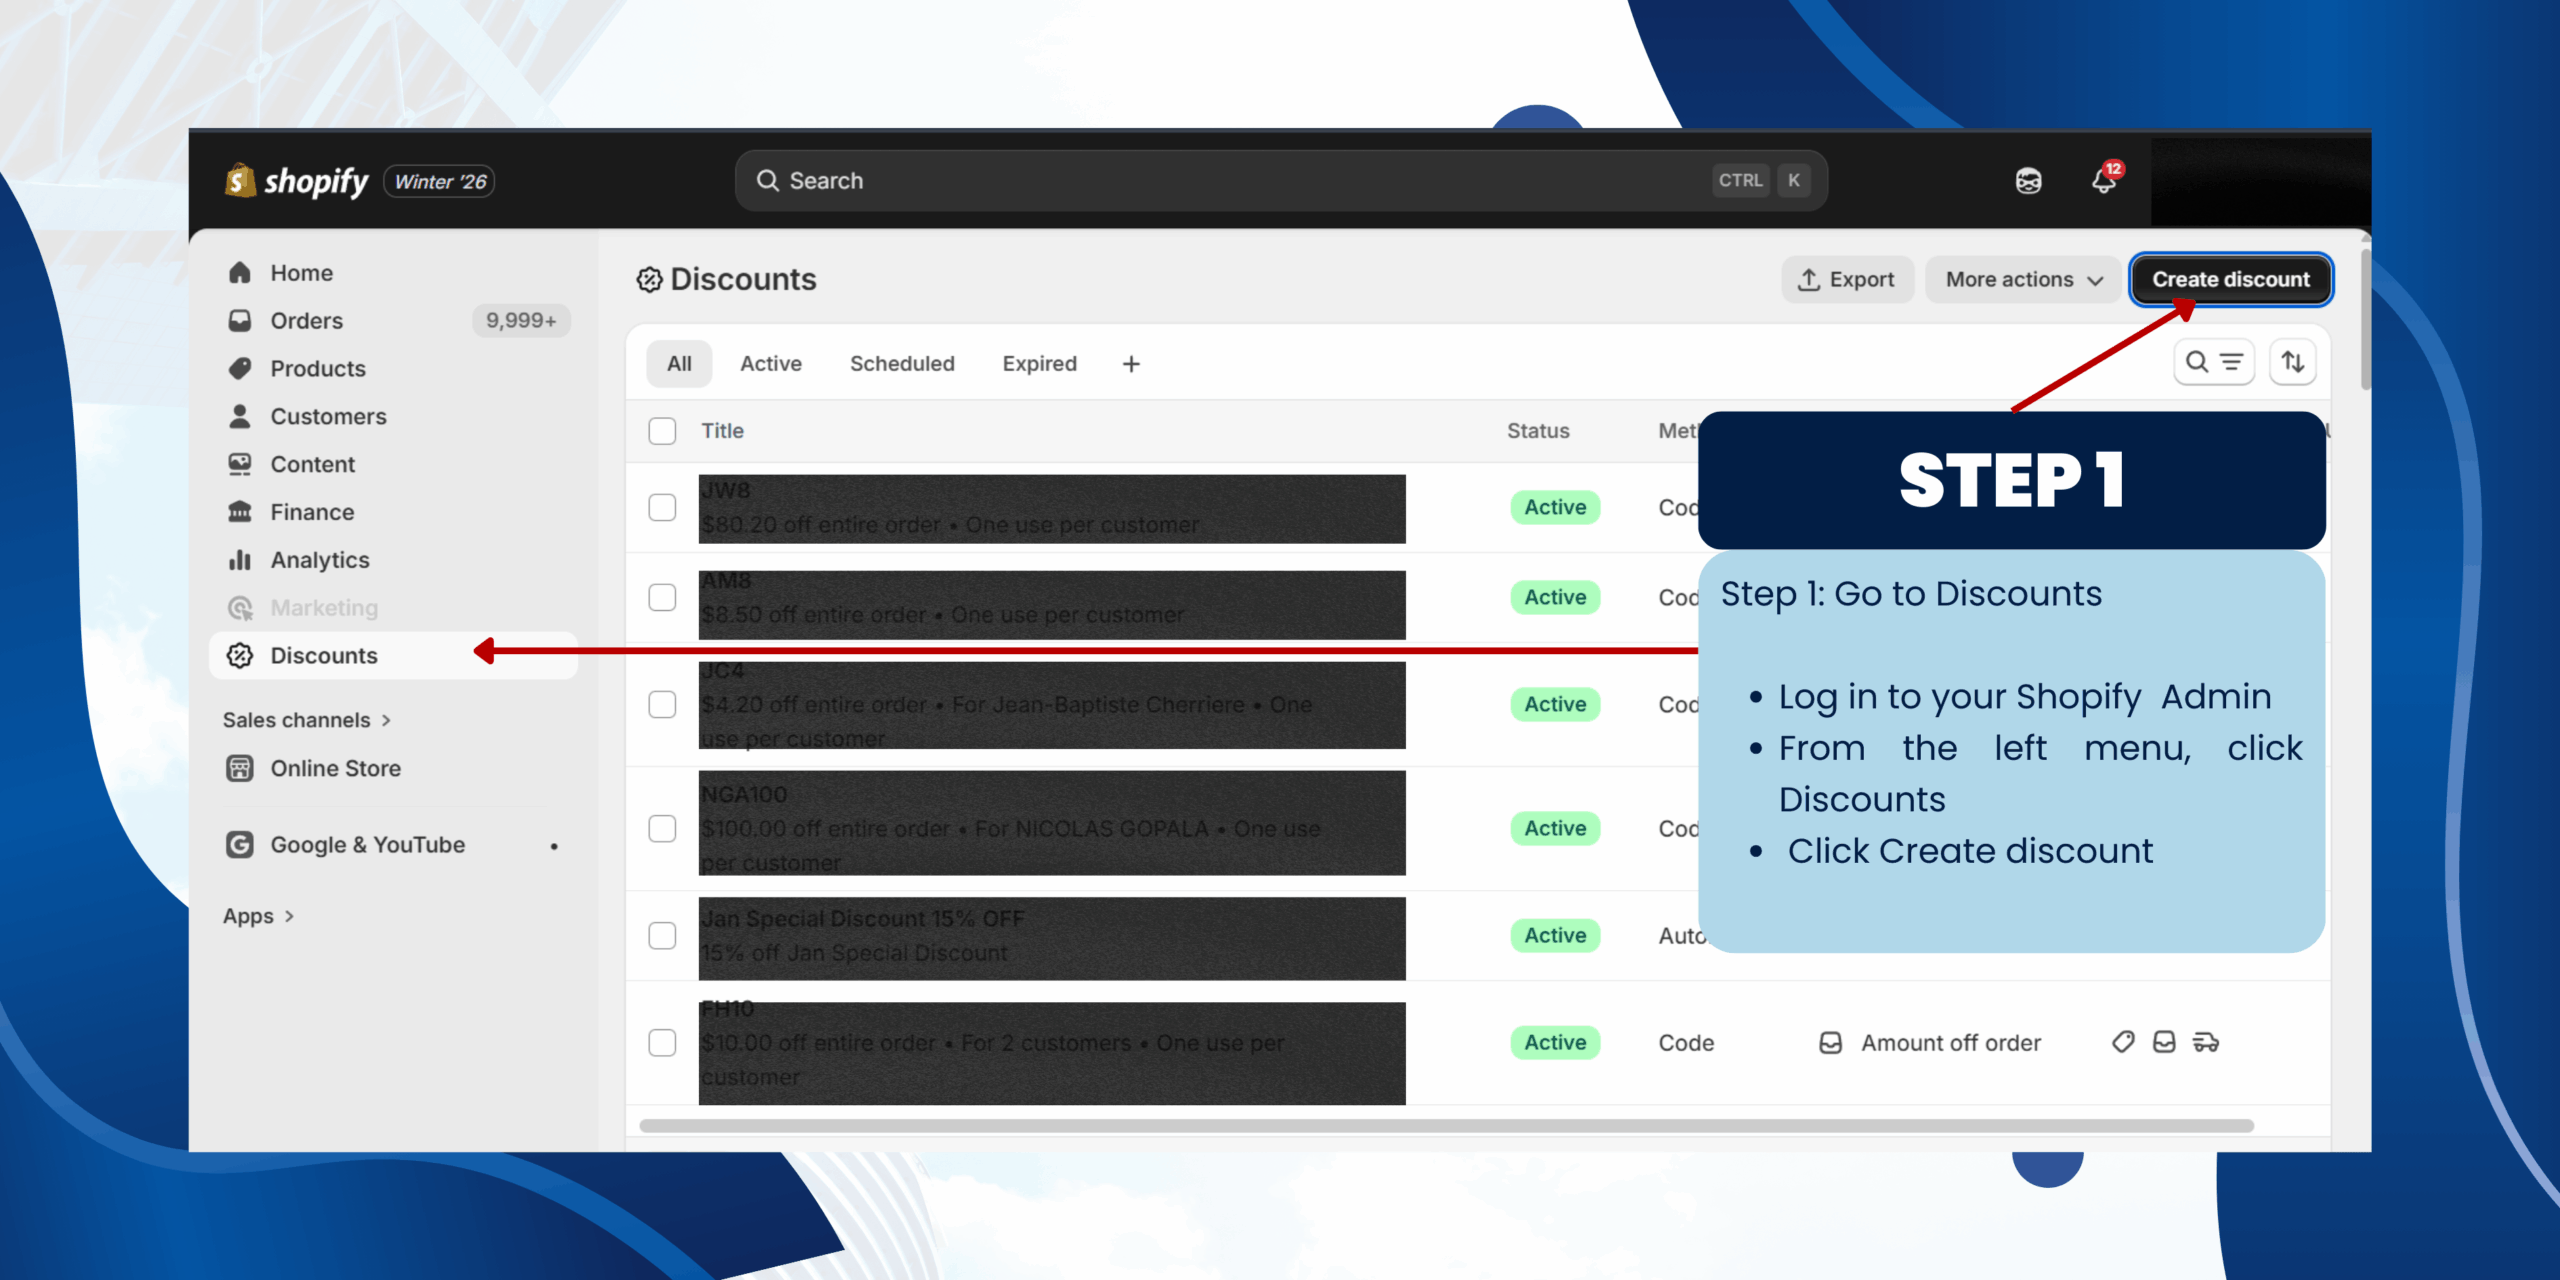
Step 1: Go to Discounts
Log in to your Shopify Admin
From the left menu, click Discounts
Click Create discount
Log in to your Shopify Admin
From the left menu, click Discounts
Click Create discount
Step 2: Select Discount Type
Choose the discount type that matches your promotion:
a) Amount off products
b) Buy X get Y
c) Amount off order
d) Free shipping
Choose the discount type that matches your promotion:
a) Amount off products
b) Buy X get Y
c) Amount off order
d) Free shipping

a) Amount Off Products
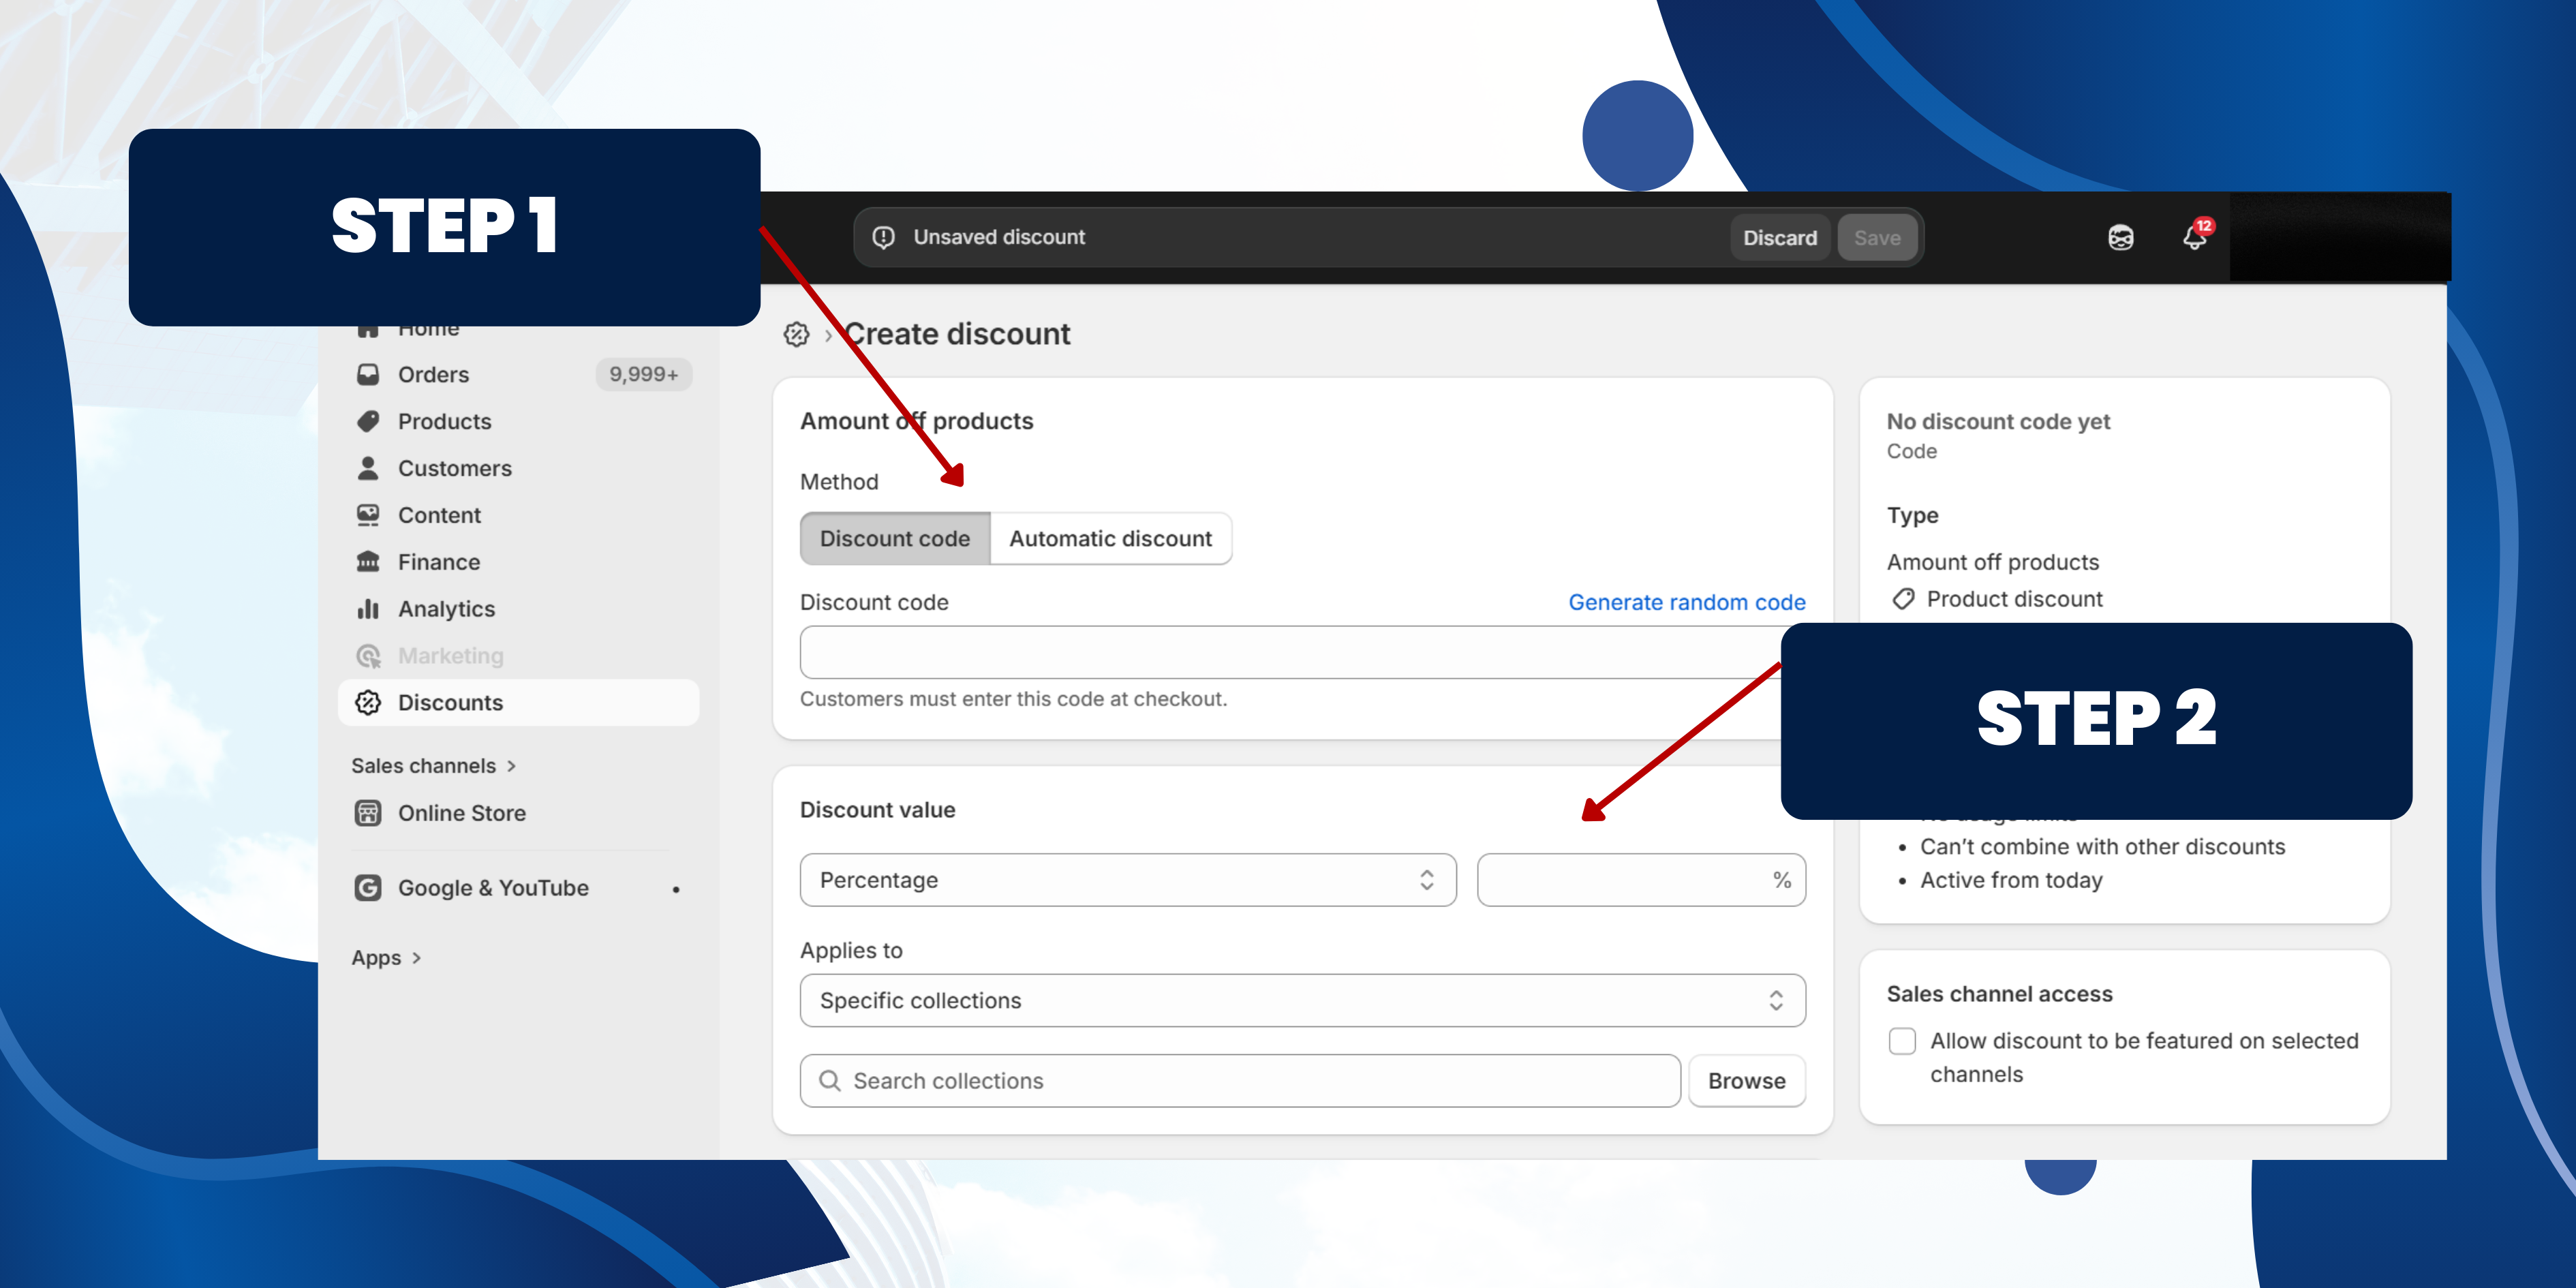
Step 1: Choose Discount Method
You can choose between:
Discount Code
Automatic Discount
• Applied automatically at checkout
• Best for storewide sales and promotions
Step 2: Set Discount Details
Discount Value
• Choose Percentage or Fixed amount
• Example: 15% off
Applies To
• Specific products
• Specific collections
Select the products or collections you want the discount to apply to.
You can choose between:
Discount Code
- • Customers must enter a code at checkout
- • Best for email campaigns, influencers, or exclusive promos
Automatic Discount
• Applied automatically at checkout
• Best for storewide sales and promotions
Step 2: Set Discount Details
Discount Value
• Choose Percentage or Fixed amount
• Example: 15% off
Applies To
• Specific products
• Specific collections
Select the products or collections you want the discount to apply to.
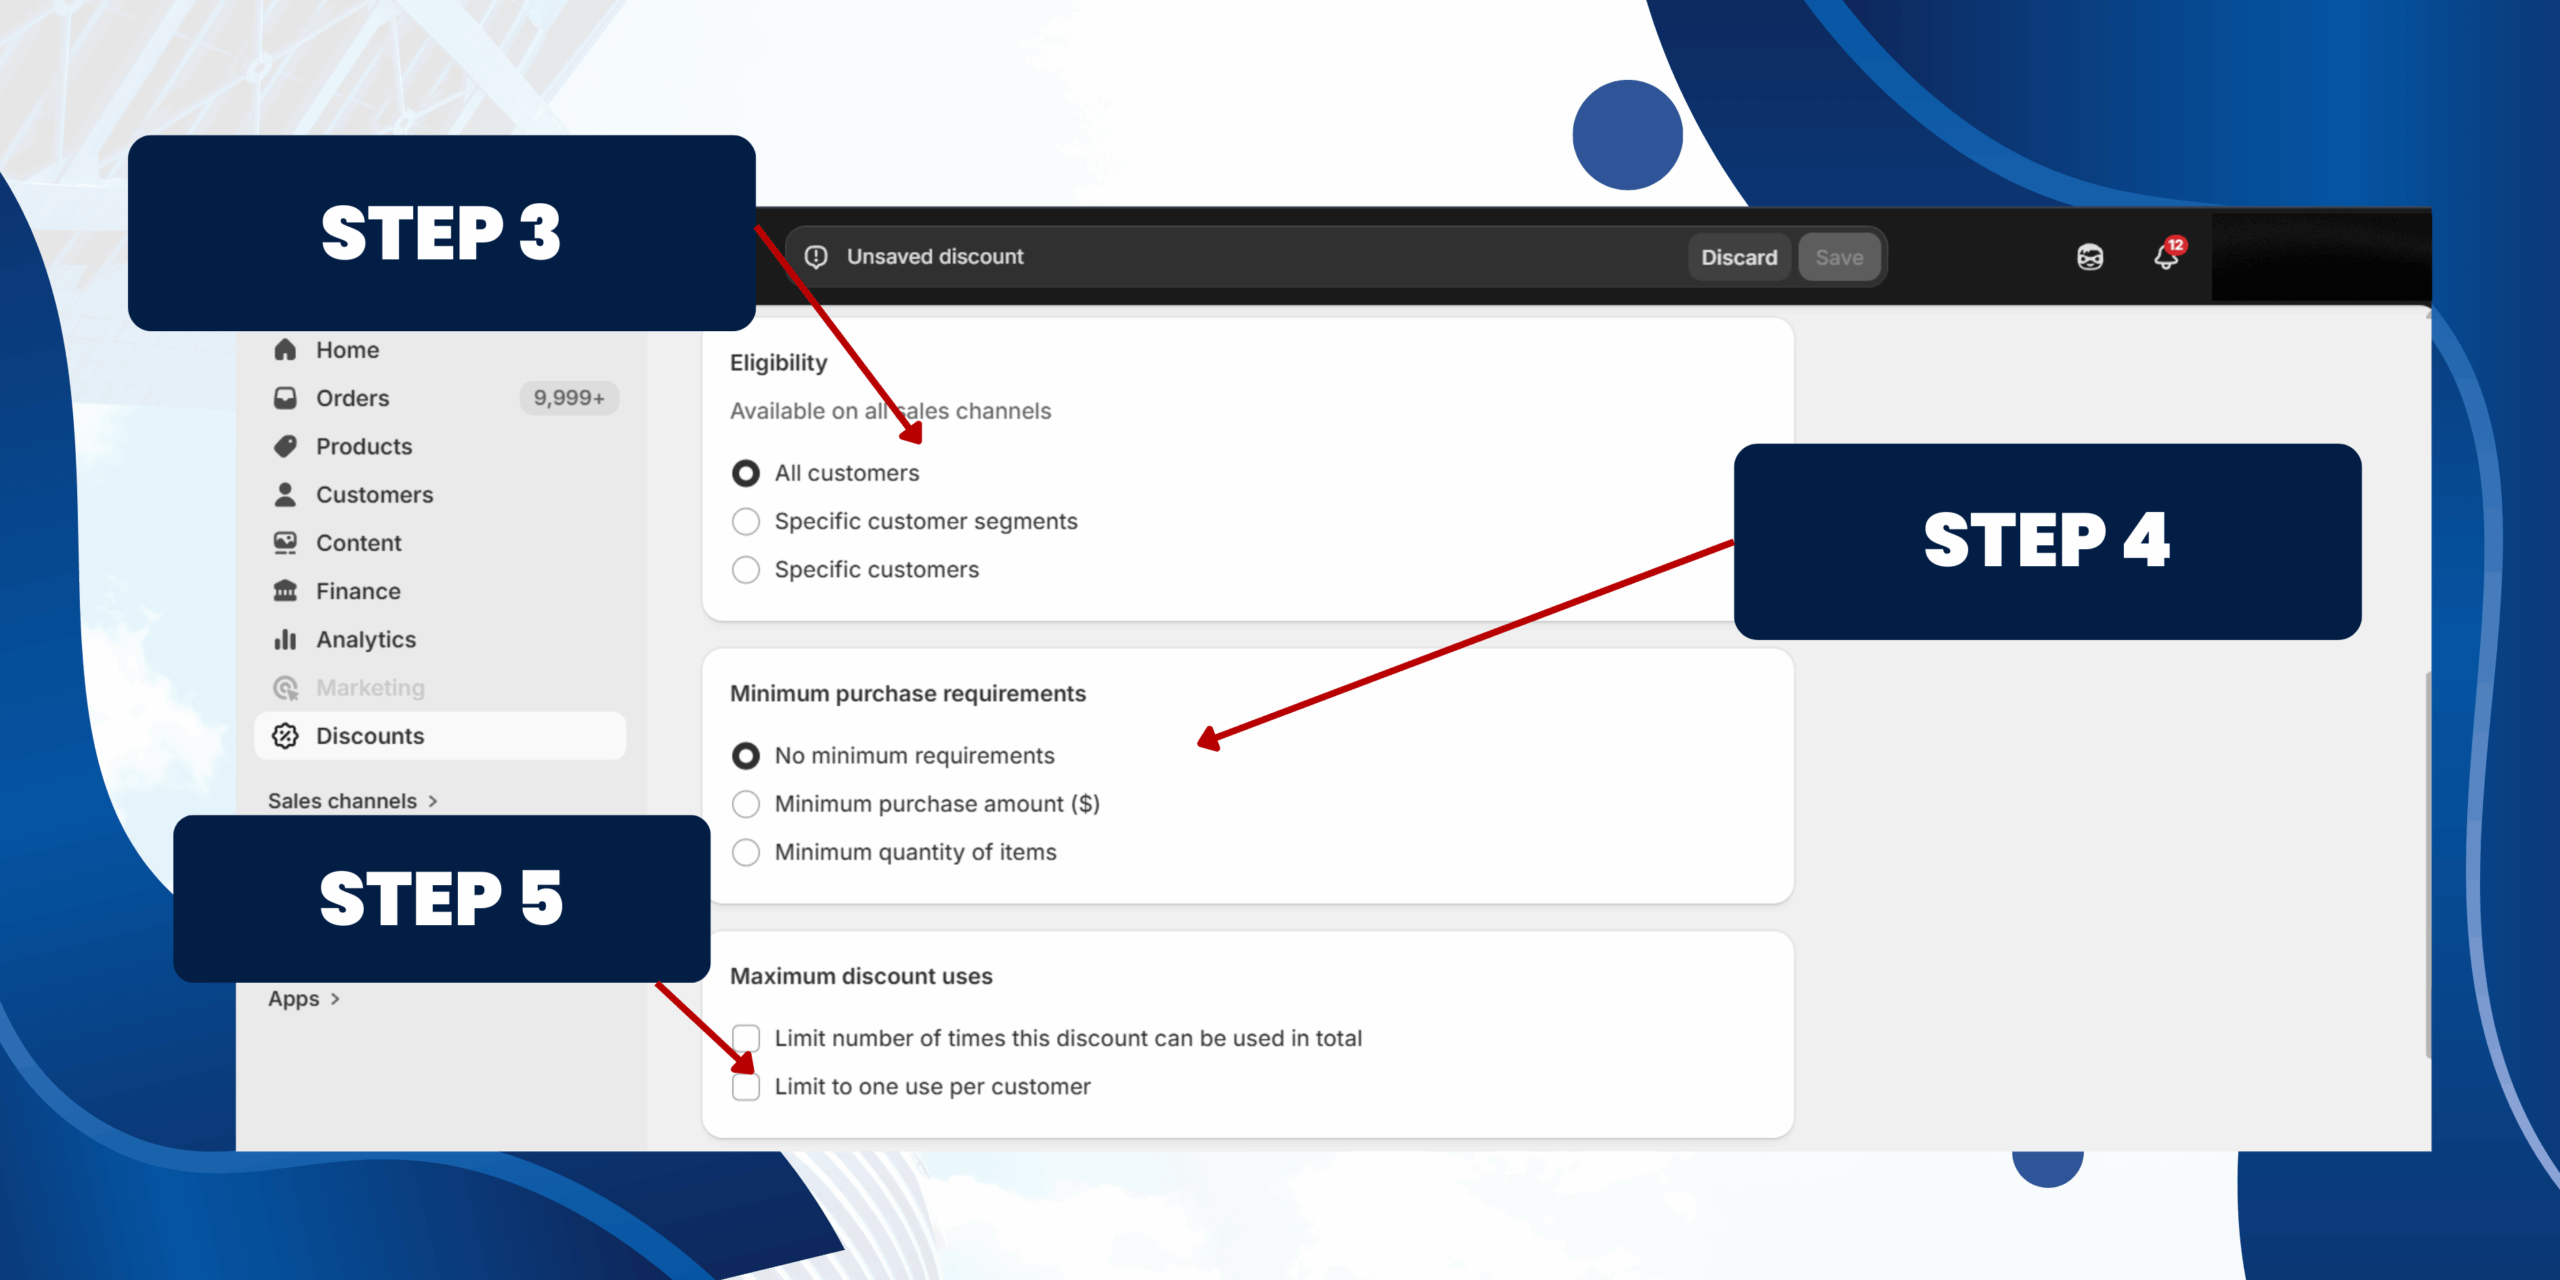
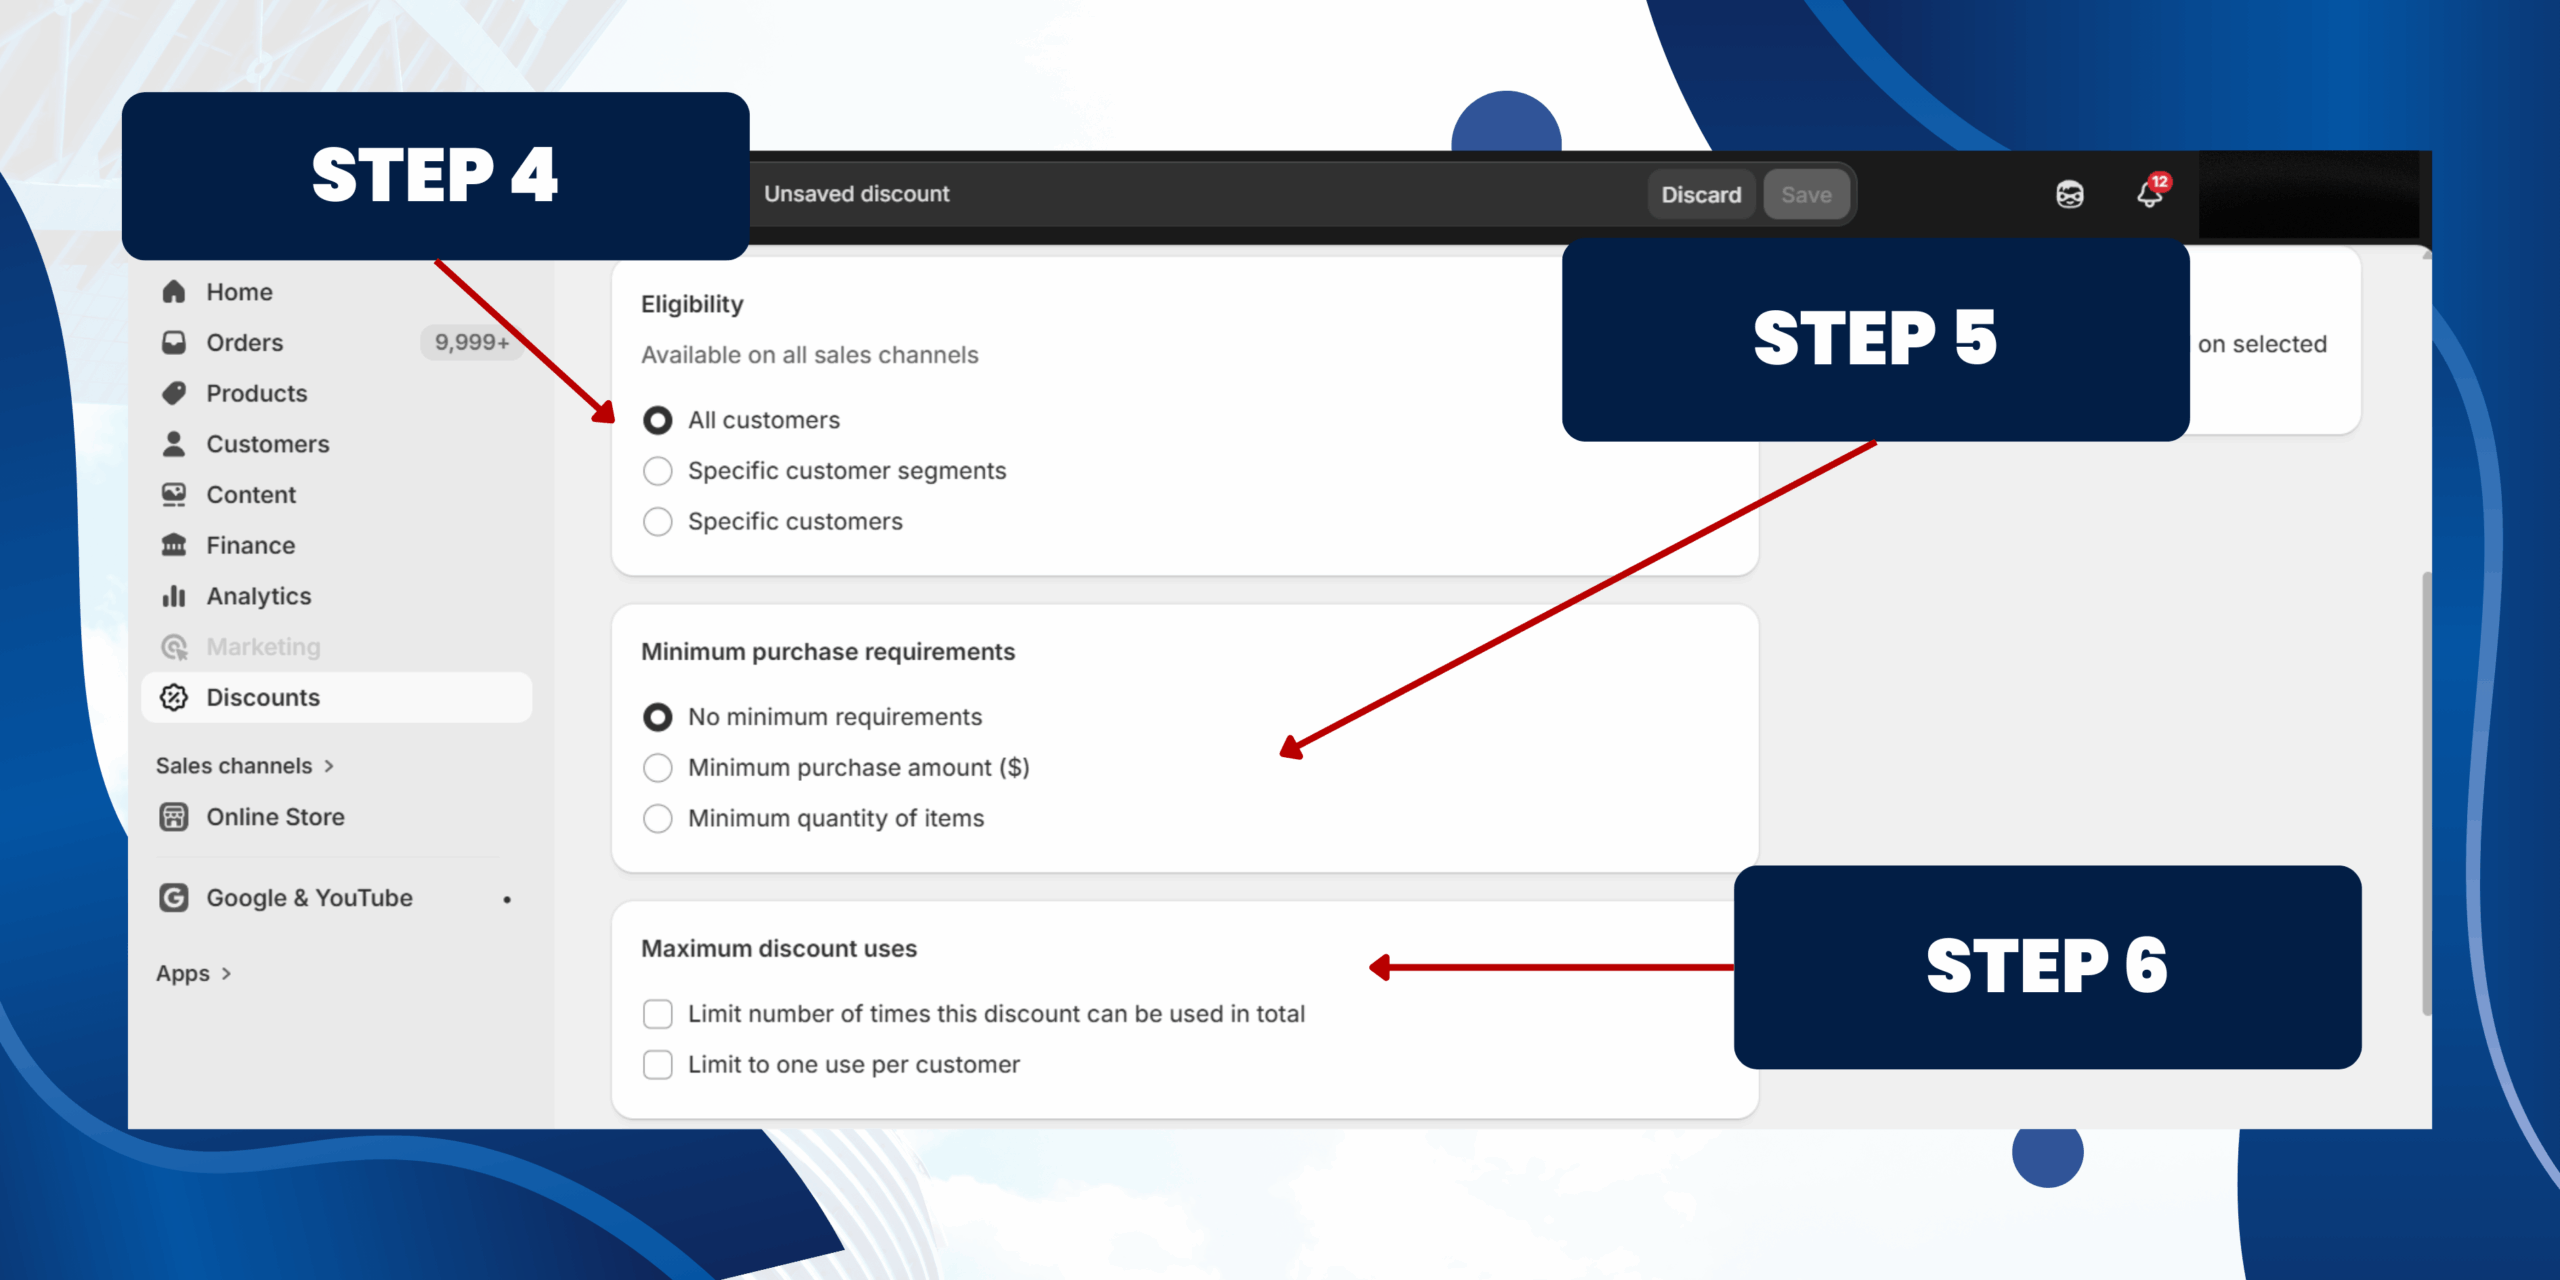
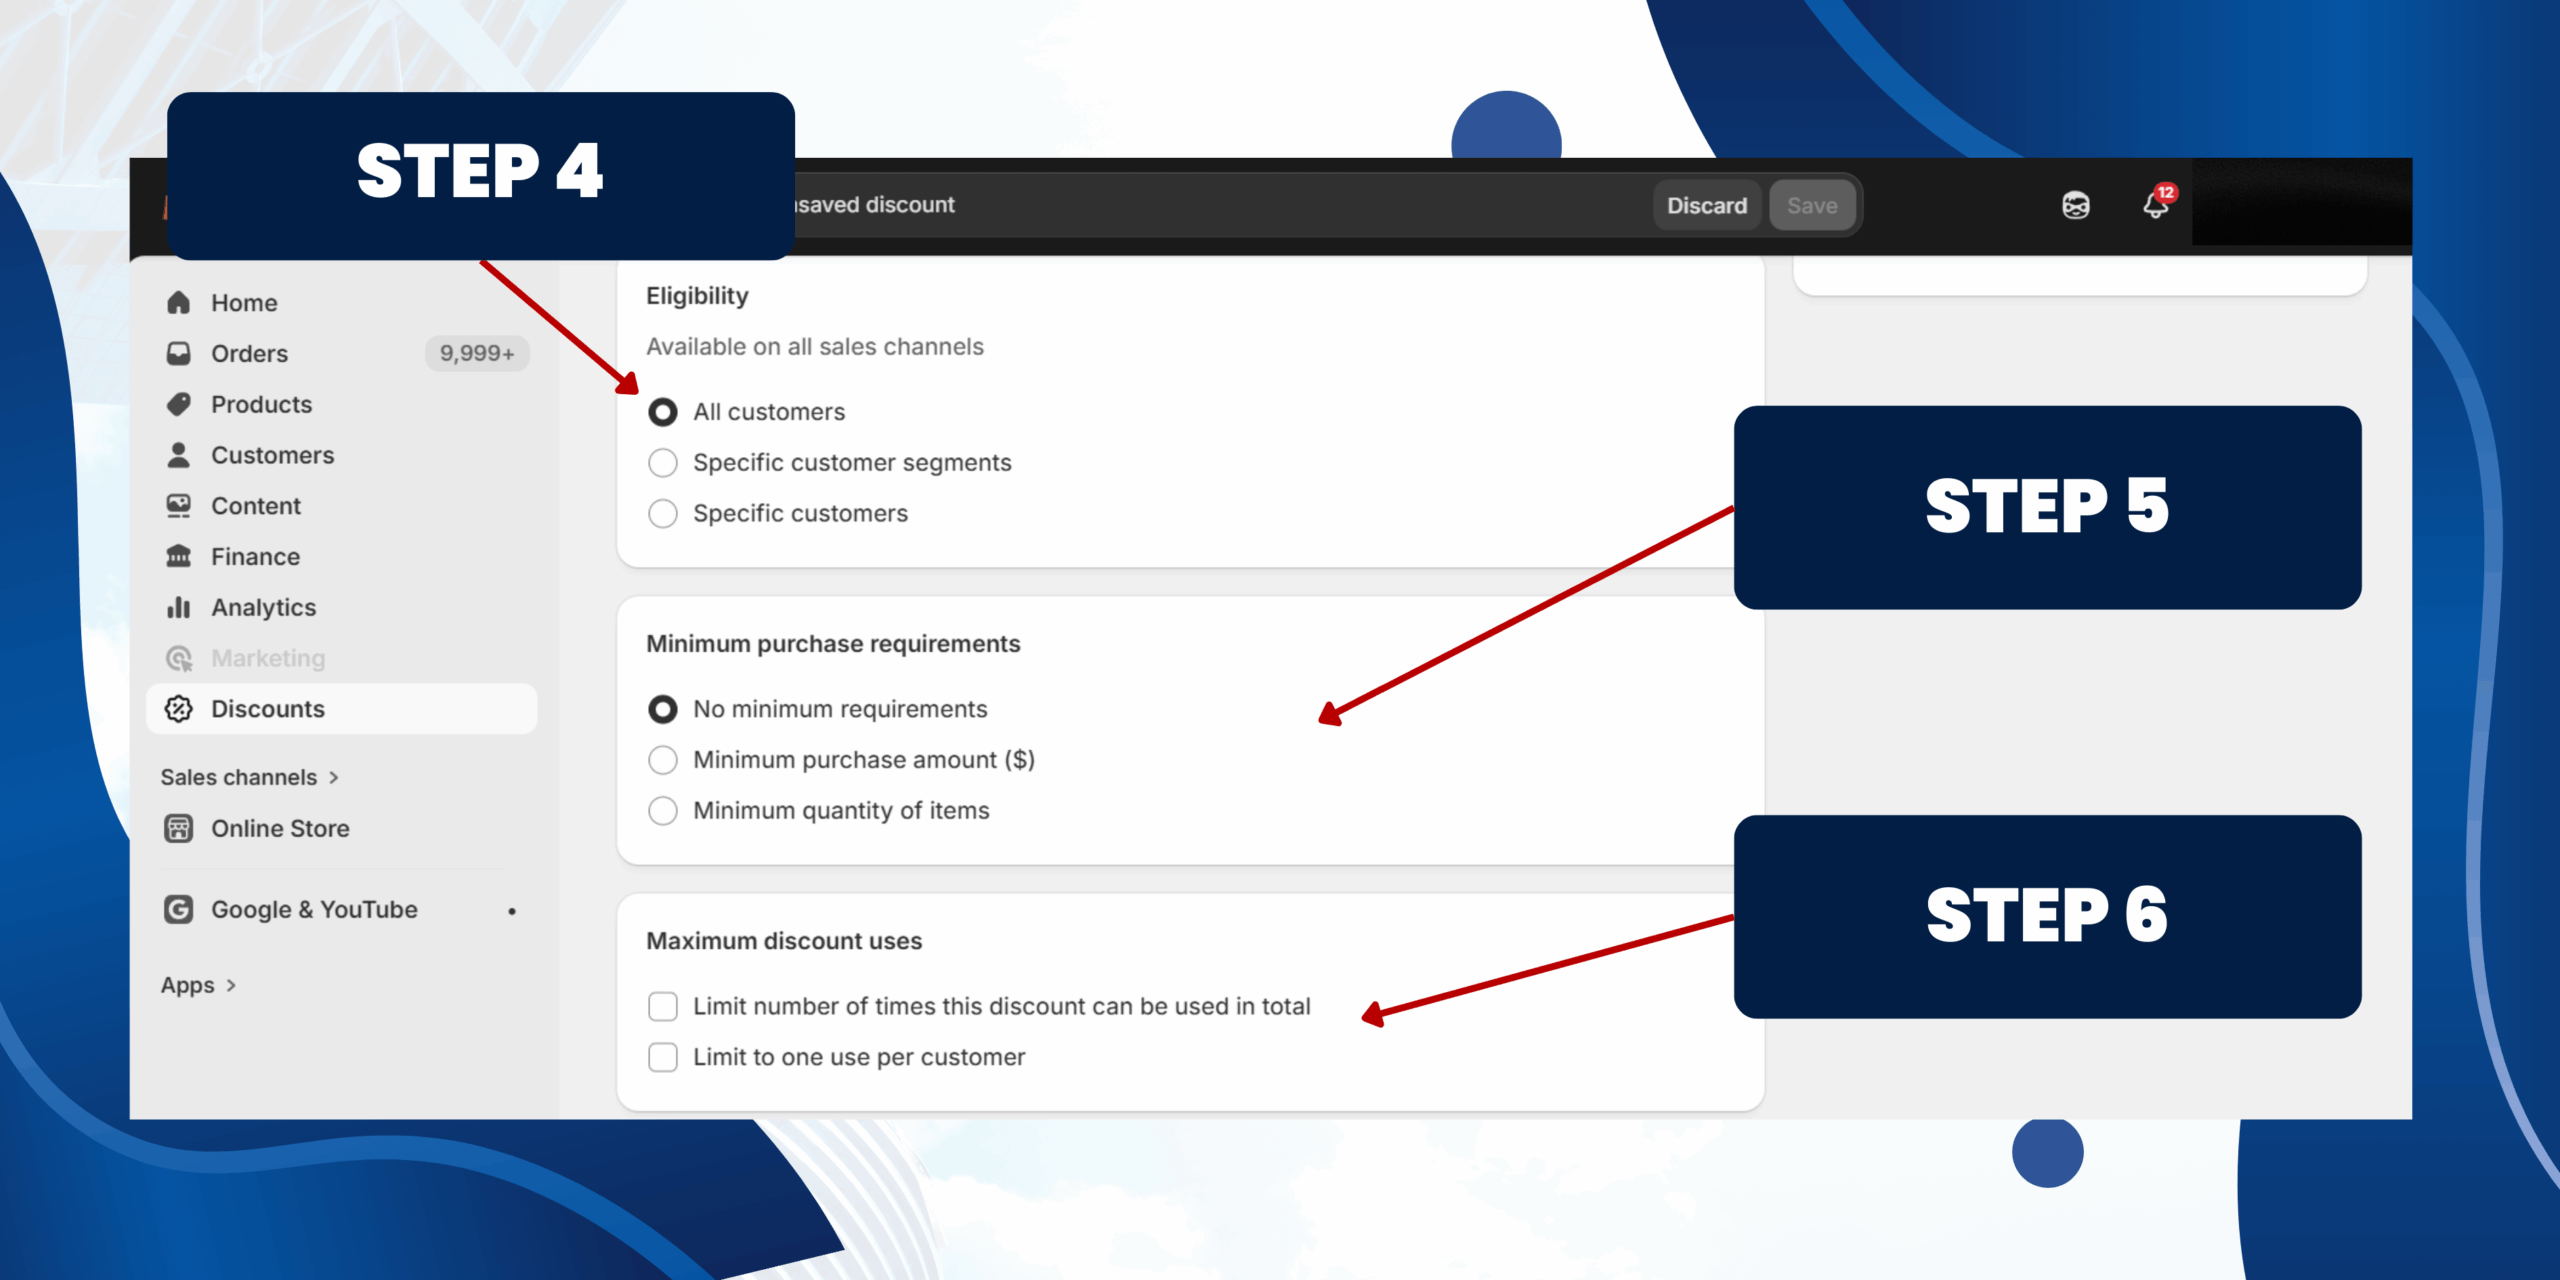
Step 3: Set Eligibility
You can choose the discount available to:
Step 4: Set Minimum Purchase Requirements
You can control how the discount is used:
• No minimum requirements
• Minimum purchase amount ($)
• Minimum quantity items
Step 5: Set Maximum Discount Uses
• Limit number of times this discount can be used in total
• Limit to one use per customer
You can choose the discount available to:
- • All customers
- • Specific customer segments
- • Specific customers
Step 4: Set Minimum Purchase Requirements
You can control how the discount is used:
• No minimum requirements
• Minimum purchase amount ($)
• Minimum quantity items
Step 5: Set Maximum Discount Uses
• Limit number of times this discount can be used in total
• Limit to one use per customer
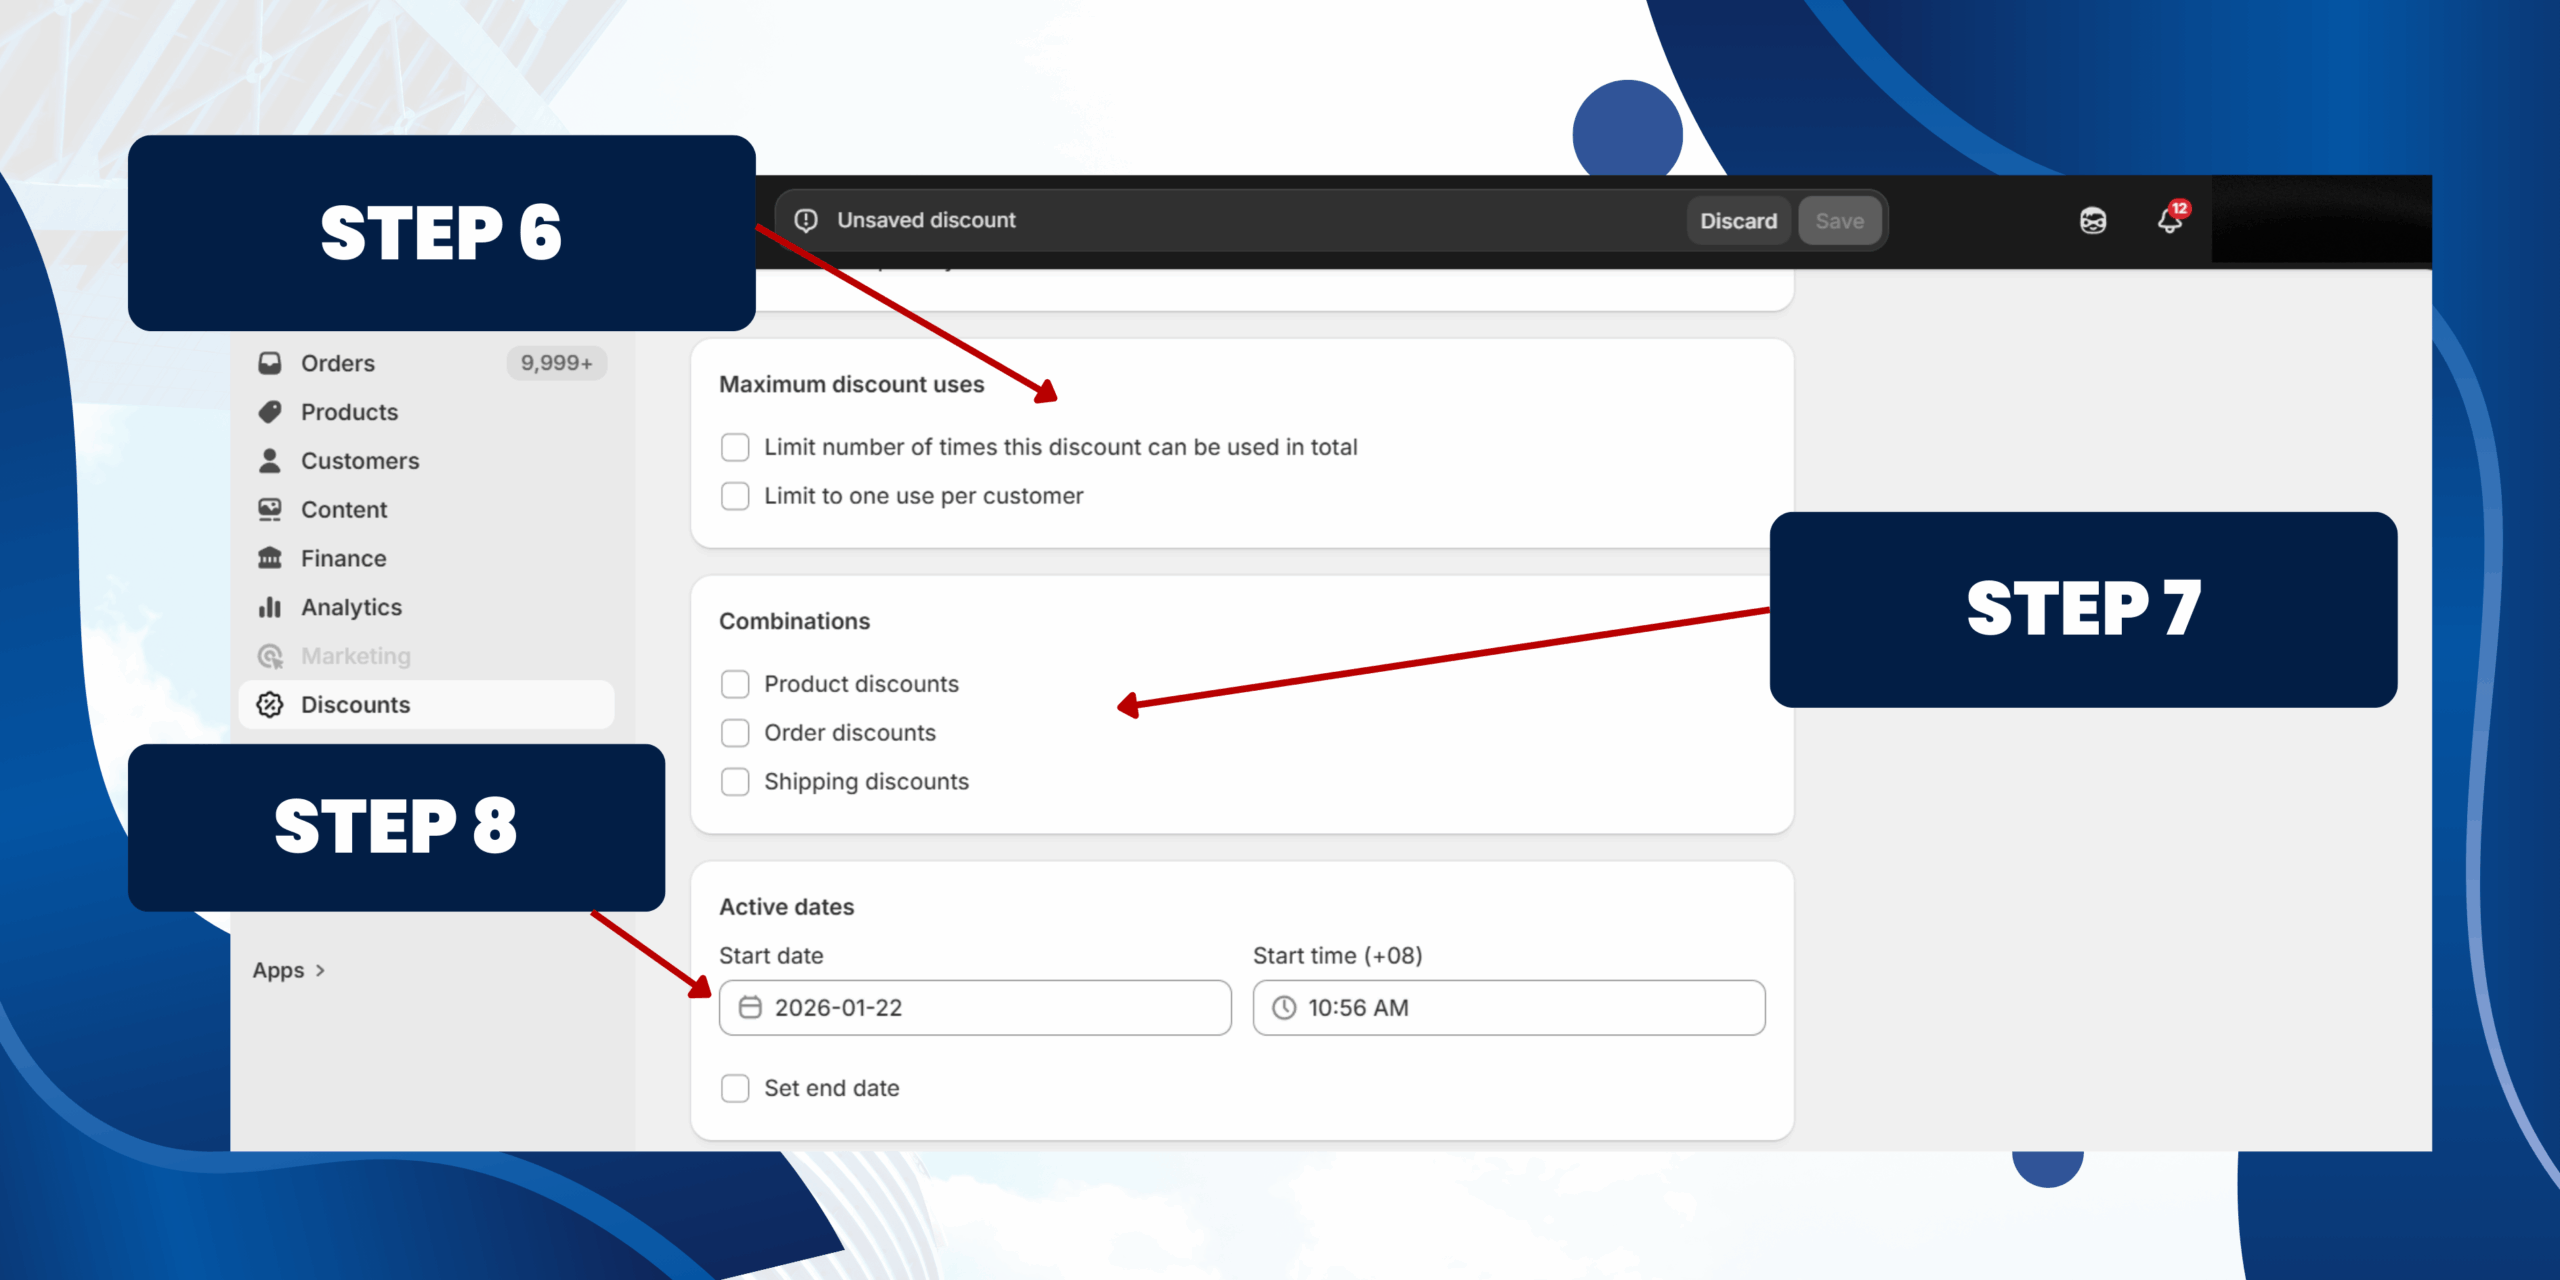
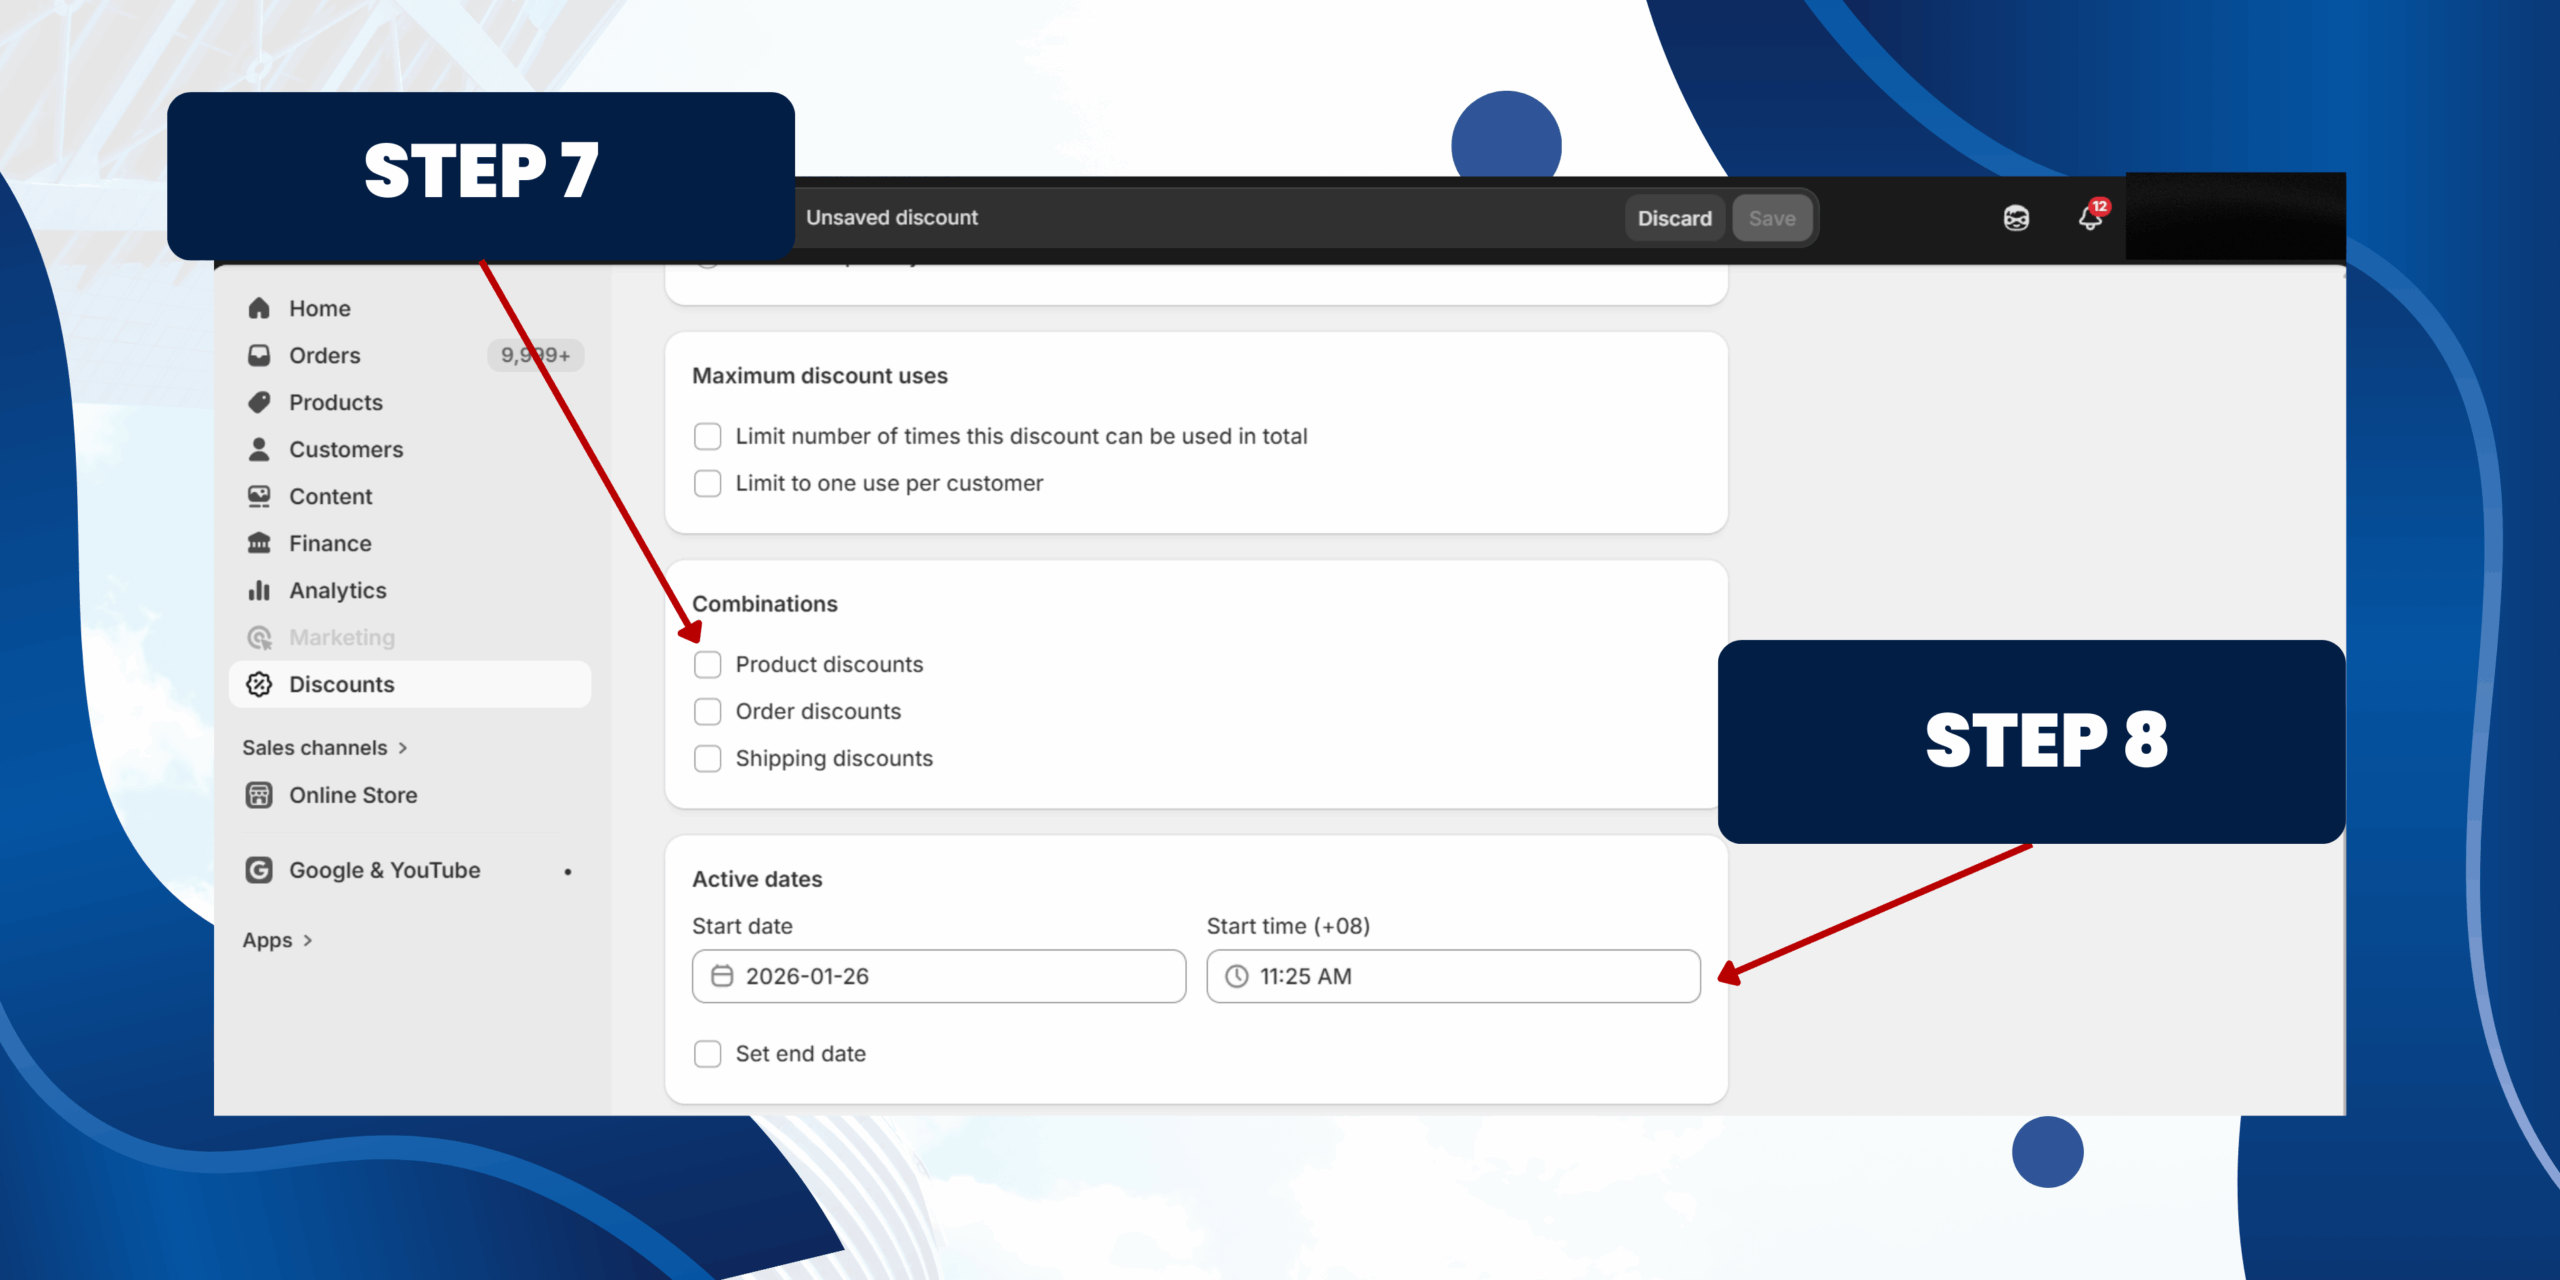
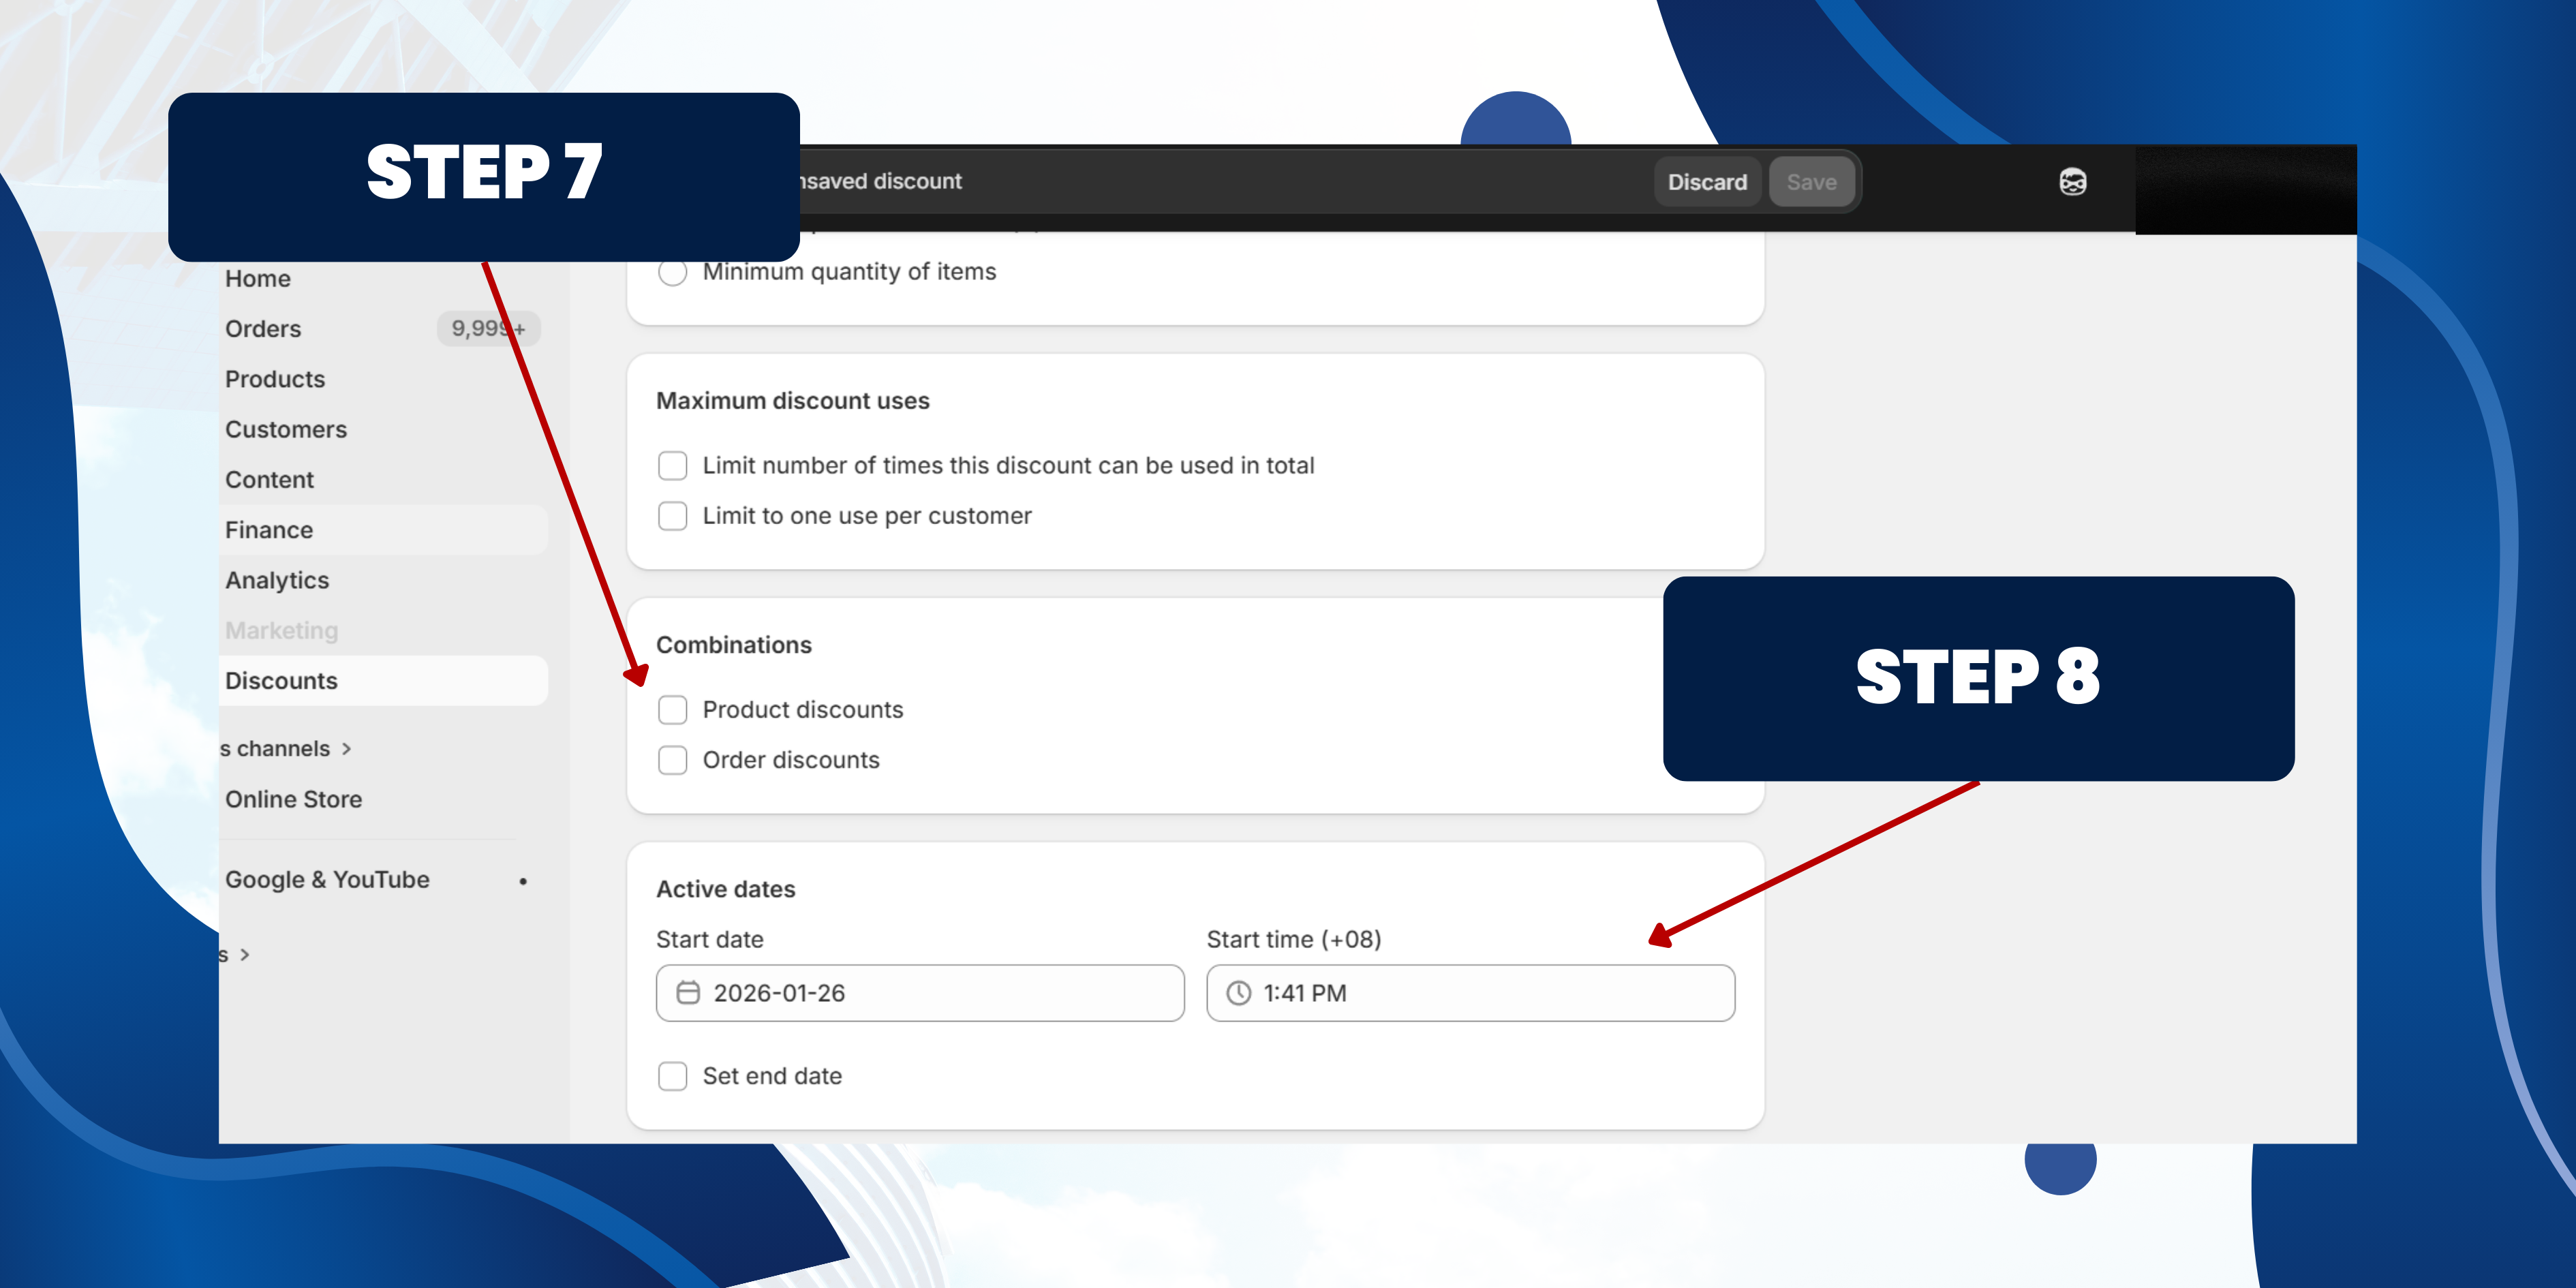
Step 6: Set Combinations
You can combine with other discounts:
Step 7: Active Dates
• Set a start date and end date
• Set a start time
Useful for time-limited campaigns like seasonal sales
Step 8: Save the Discount
• Click Save , and your discount will be active based on your settings.
You can combine with other discounts:
- • Product discounts
- • Order discounts
- • Shipping discounts
Step 7: Active Dates
• Set a start date and end date
• Set a start time
Useful for time-limited campaigns like seasonal sales
Step 8: Save the Discount
• Click Save , and your discount will be active based on your settings.
b) Buy X Get Y
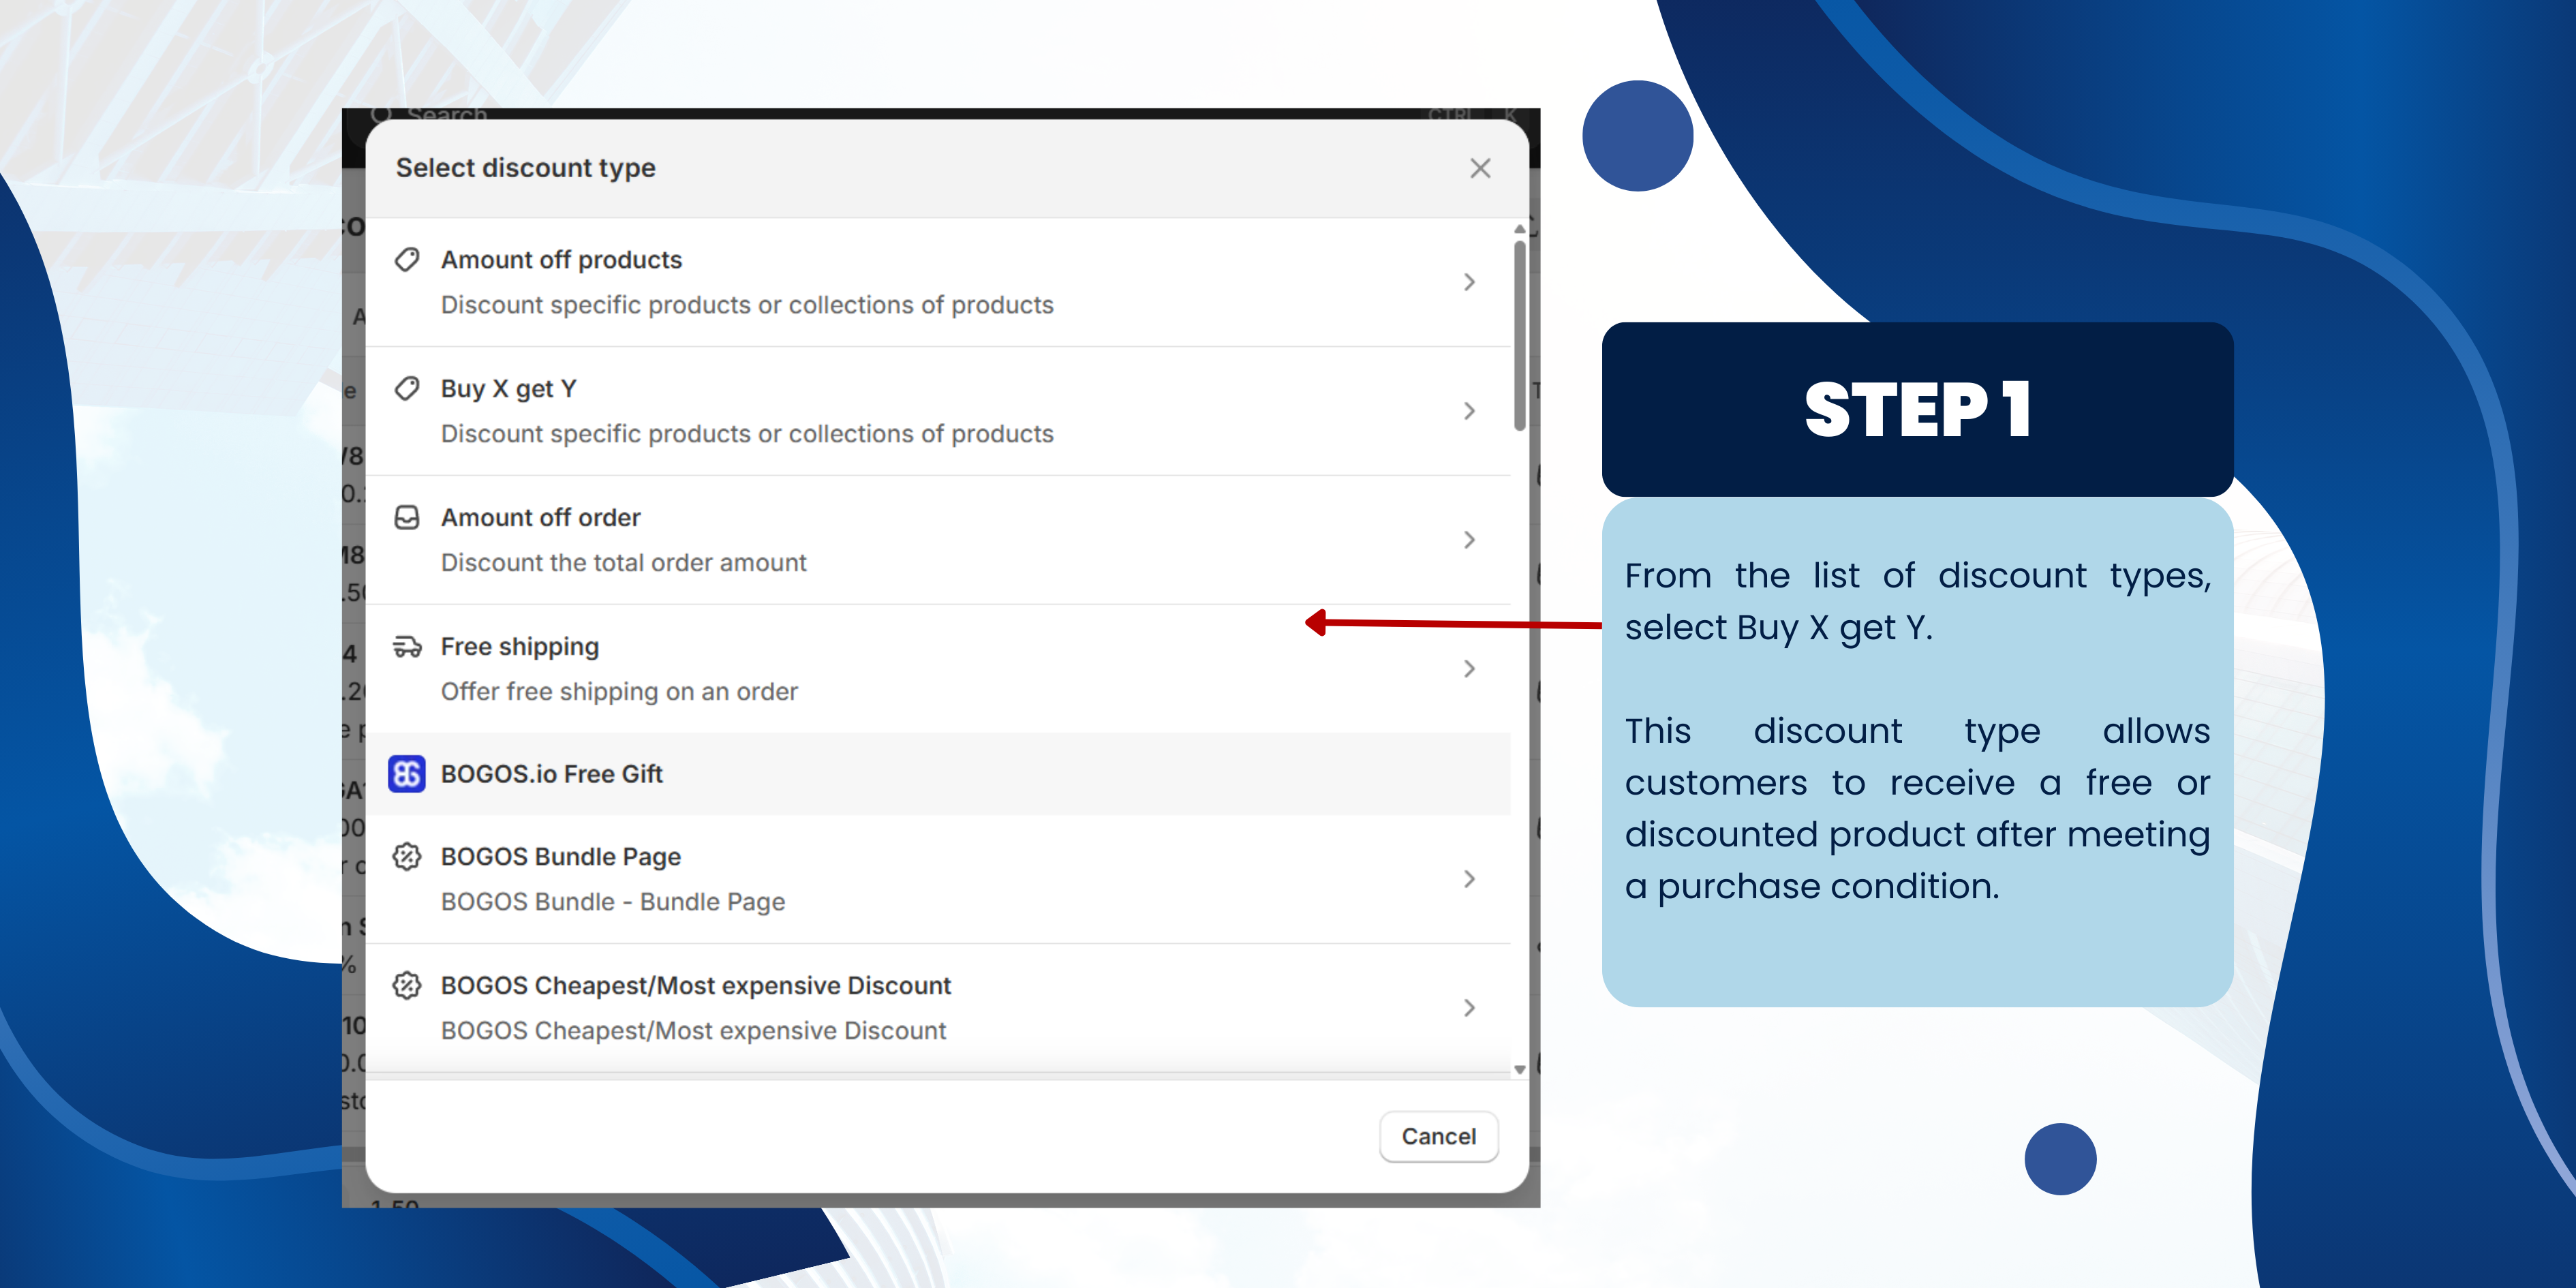
Step 1: Select Buy X Get Y
From the list of discount types, select Buy X get Y.
This discount type allows customers to receive a free or discounted product after meeting a purchase condition.
From the list of discount types, select Buy X get Y.
This discount type allows customers to receive a free or discounted product after meeting a purchase condition.
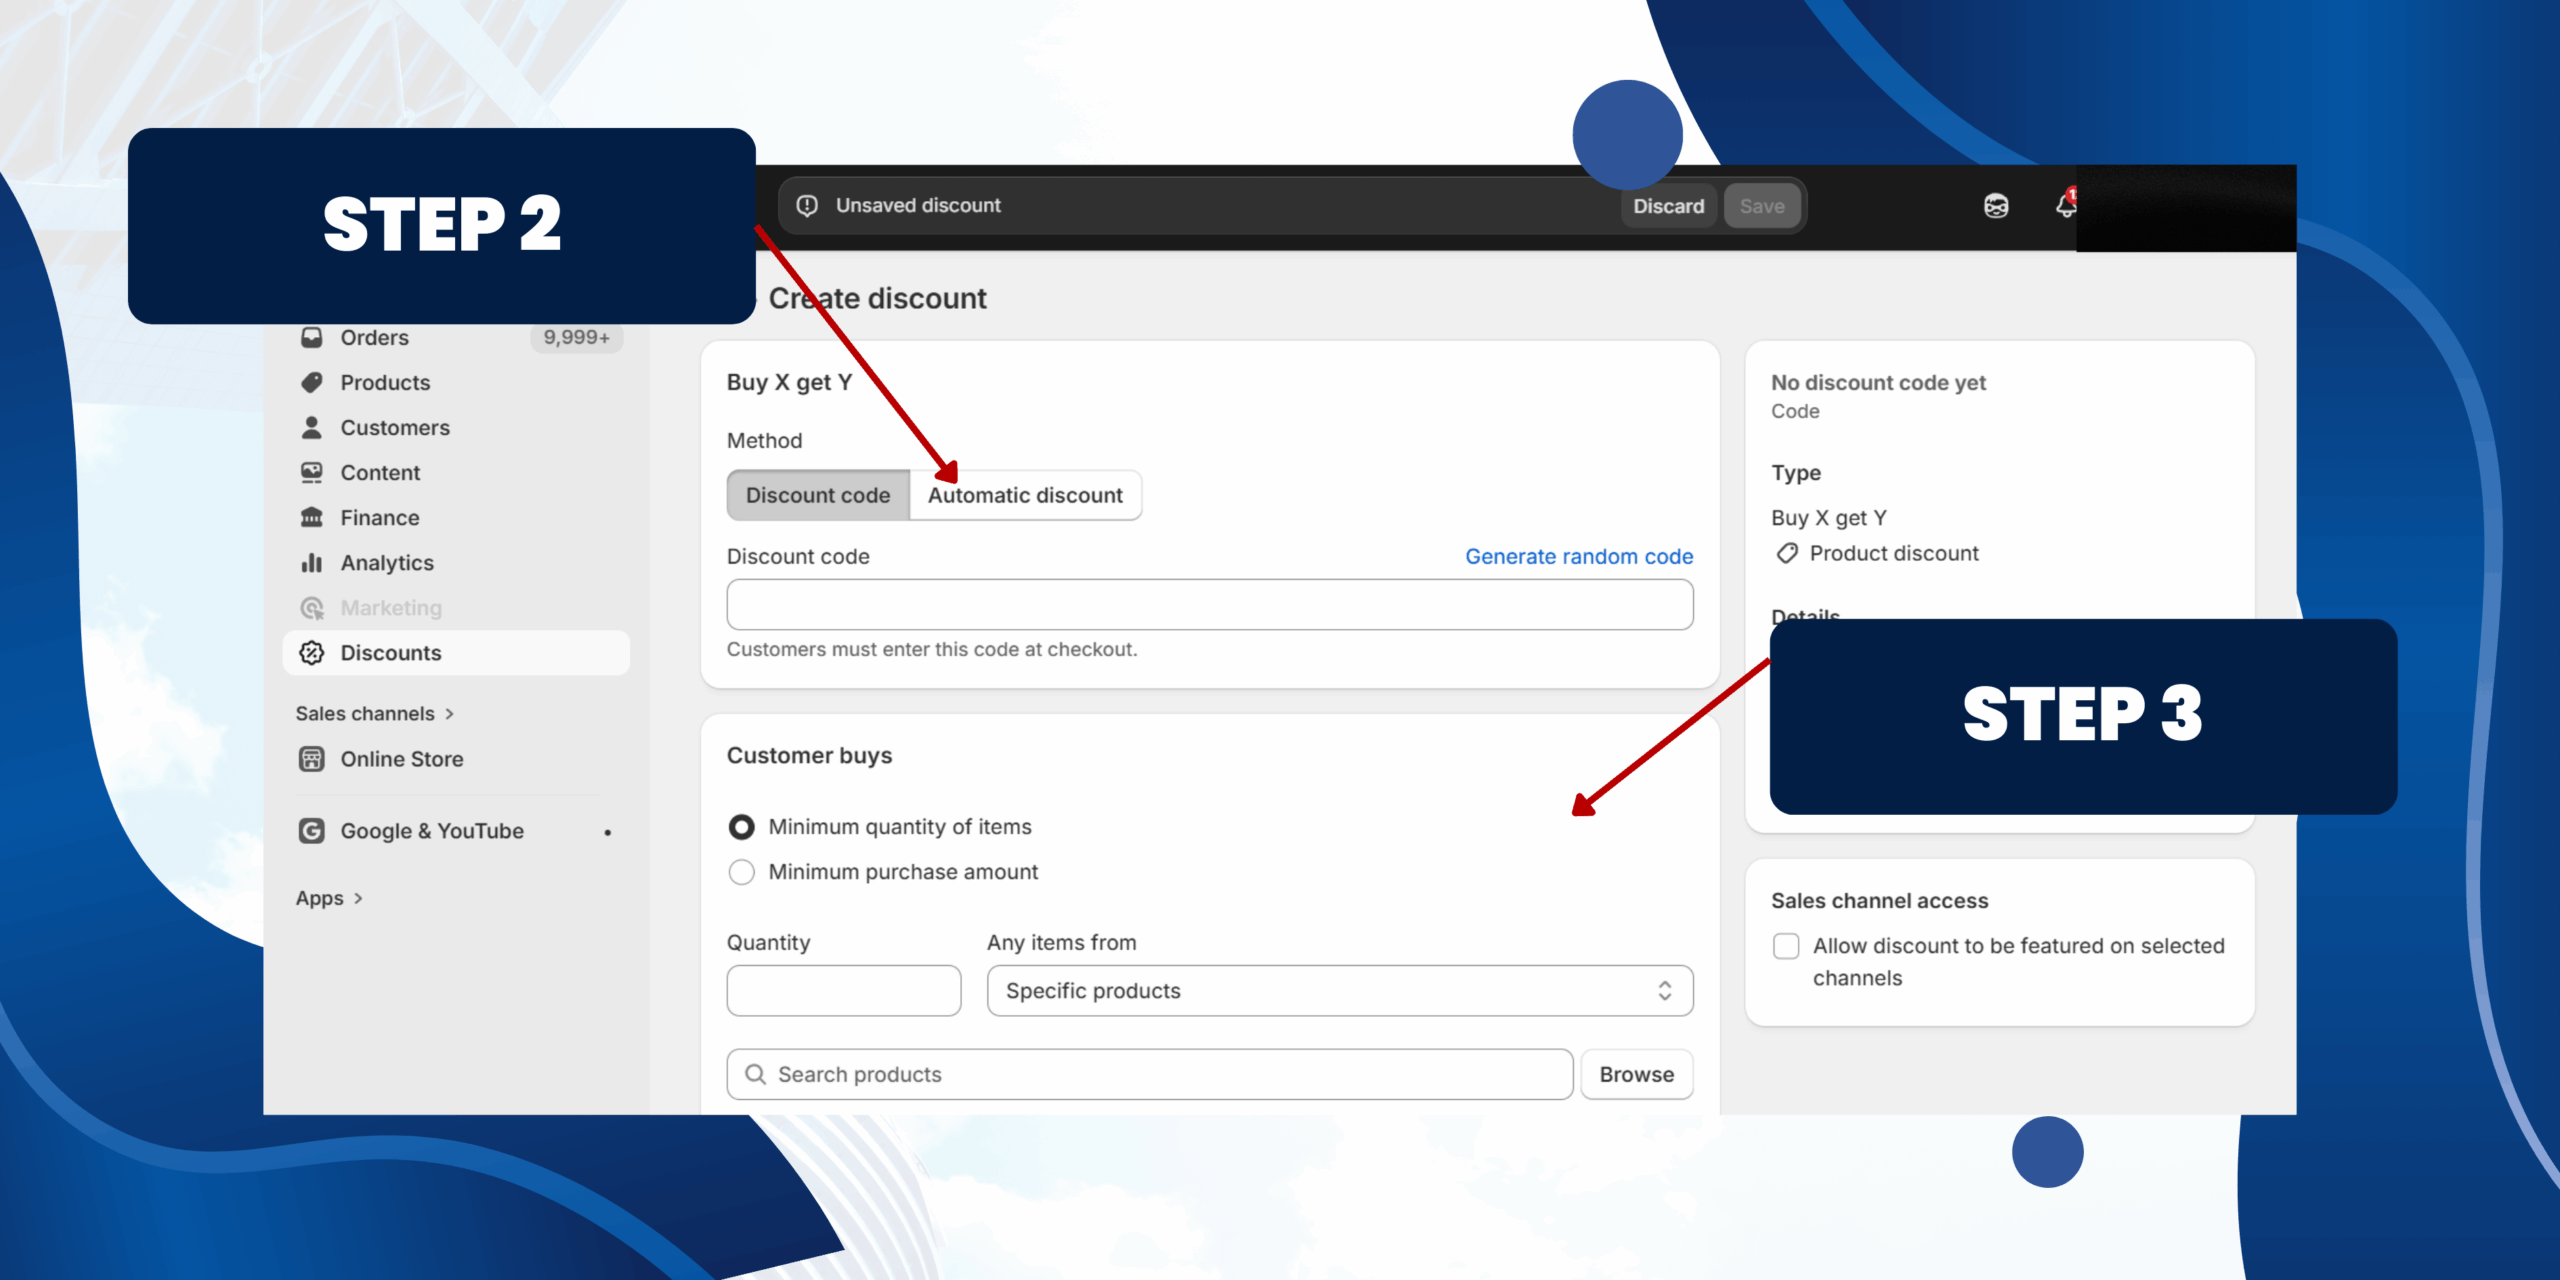
Step 2: Choose Discount Method
You can choose how the discount is applied:
Discount code
• Customers must enter a code at checkout
• Best for email campaigns, influencers, or private promotions
Automatic discount
• Discount applies automatically when conditions are met
• Best for storewide or public promotions
⚠️ Shopify allows only one automatic discount to be active at a time.
Step 3: Set Customer Buys (X)
This section defines what customers must buy to qualify for the discount.
Choose Requirement Type
Select one of the following:
1. Minimum quantity of items
• Enter the number of items customers must add to cart (e.g. 2)
• Choose whether items must come from specific products or specific collections
Example: Buy 2 items from the T-Shirts collection
2. Minimum purchase amount
• Customers must spend a minimum amount to qualify
Example: Spend $100 to unlock the reward
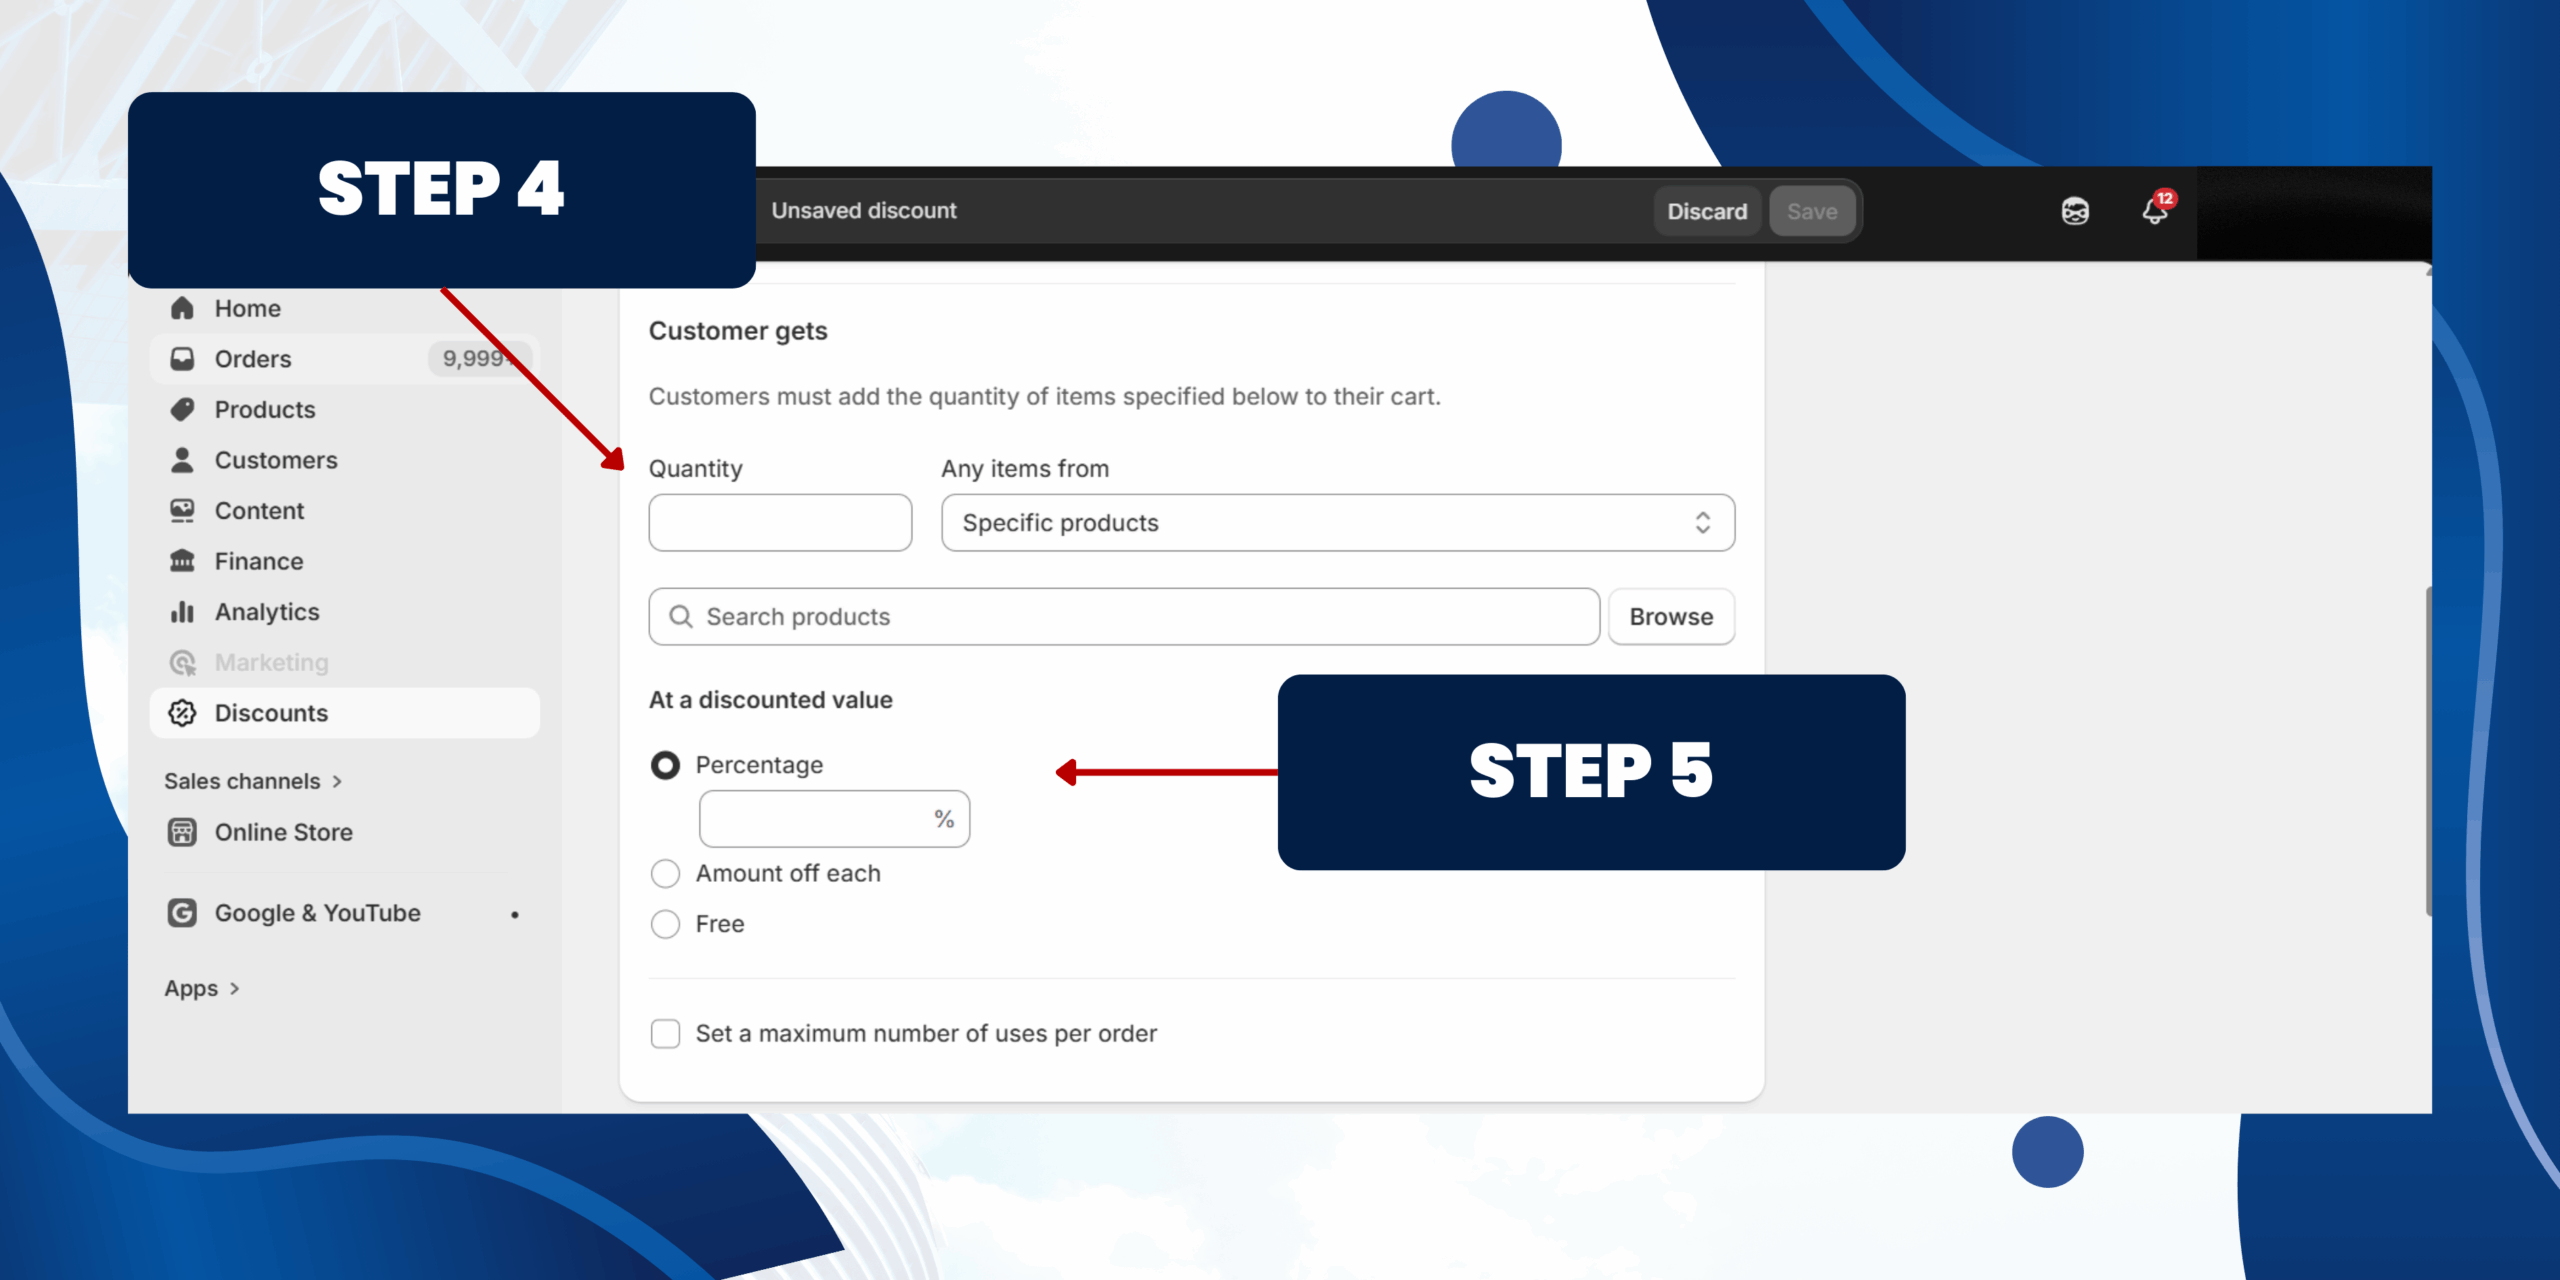
Step 4: Set Customer Gets (Y)
This section defines what customers receive once the condition is met.
Quantity
• Enter how many items customers can receive.
Any items from
Choose what products customers can get:
• Specific products
• Specific collections
⚠️Tip: Using collections makes it easier to manage future promotions.
Step 5: Choose Discounted Value
Select how the rewarded item is discounted:
• Percentage – e.g. 50% off
• Amount off each – e.g. $10 off
• Free – classic Buy 1 Get 1 Free
Step 6: Set Eligibility
You can choose the discount available to:
Step 7: Set Maximum Discount Uses
Enable this option to control how many times the discount can apply in one order.
• Limit number of times this discount can be used in total
• Limit to one use per customer
Step 8: Configure Discount Combinations
Choose whether this discount can be combined with:
• Product discounts
• Order discounts
• Shipping discounts
⚠️ Best practice: Avoid stacking discounts unless intentionally planned.
You can choose the discount available to:
- • All customers
- • Specific customer segments
- • Specific customers
Step 7: Set Maximum Discount Uses
Enable this option to control how many times the discount can apply in one order.
• Limit number of times this discount can be used in total
• Limit to one use per customer
Step 8: Configure Discount Combinations
Choose whether this discount can be combined with:
• Product discounts
• Order discounts
• Shipping discounts
⚠️ Best practice: Avoid stacking discounts unless intentionally planned.
Step 9: Active Dates
• Set a start date and end date
• Set a start time
Useful for time-limited campaigns like seasonal sales
Step 10: Save the Discount
Click Save, then:
• Add qualifying products to the cart
• Confirm the discount applies correctly at checkout
• Set a start date and end date
• Set a start time
Useful for time-limited campaigns like seasonal sales
Step 10: Save the Discount
Click Save, then:
• Add qualifying products to the cart
• Confirm the discount applies correctly at checkout
c) Amount Off Order
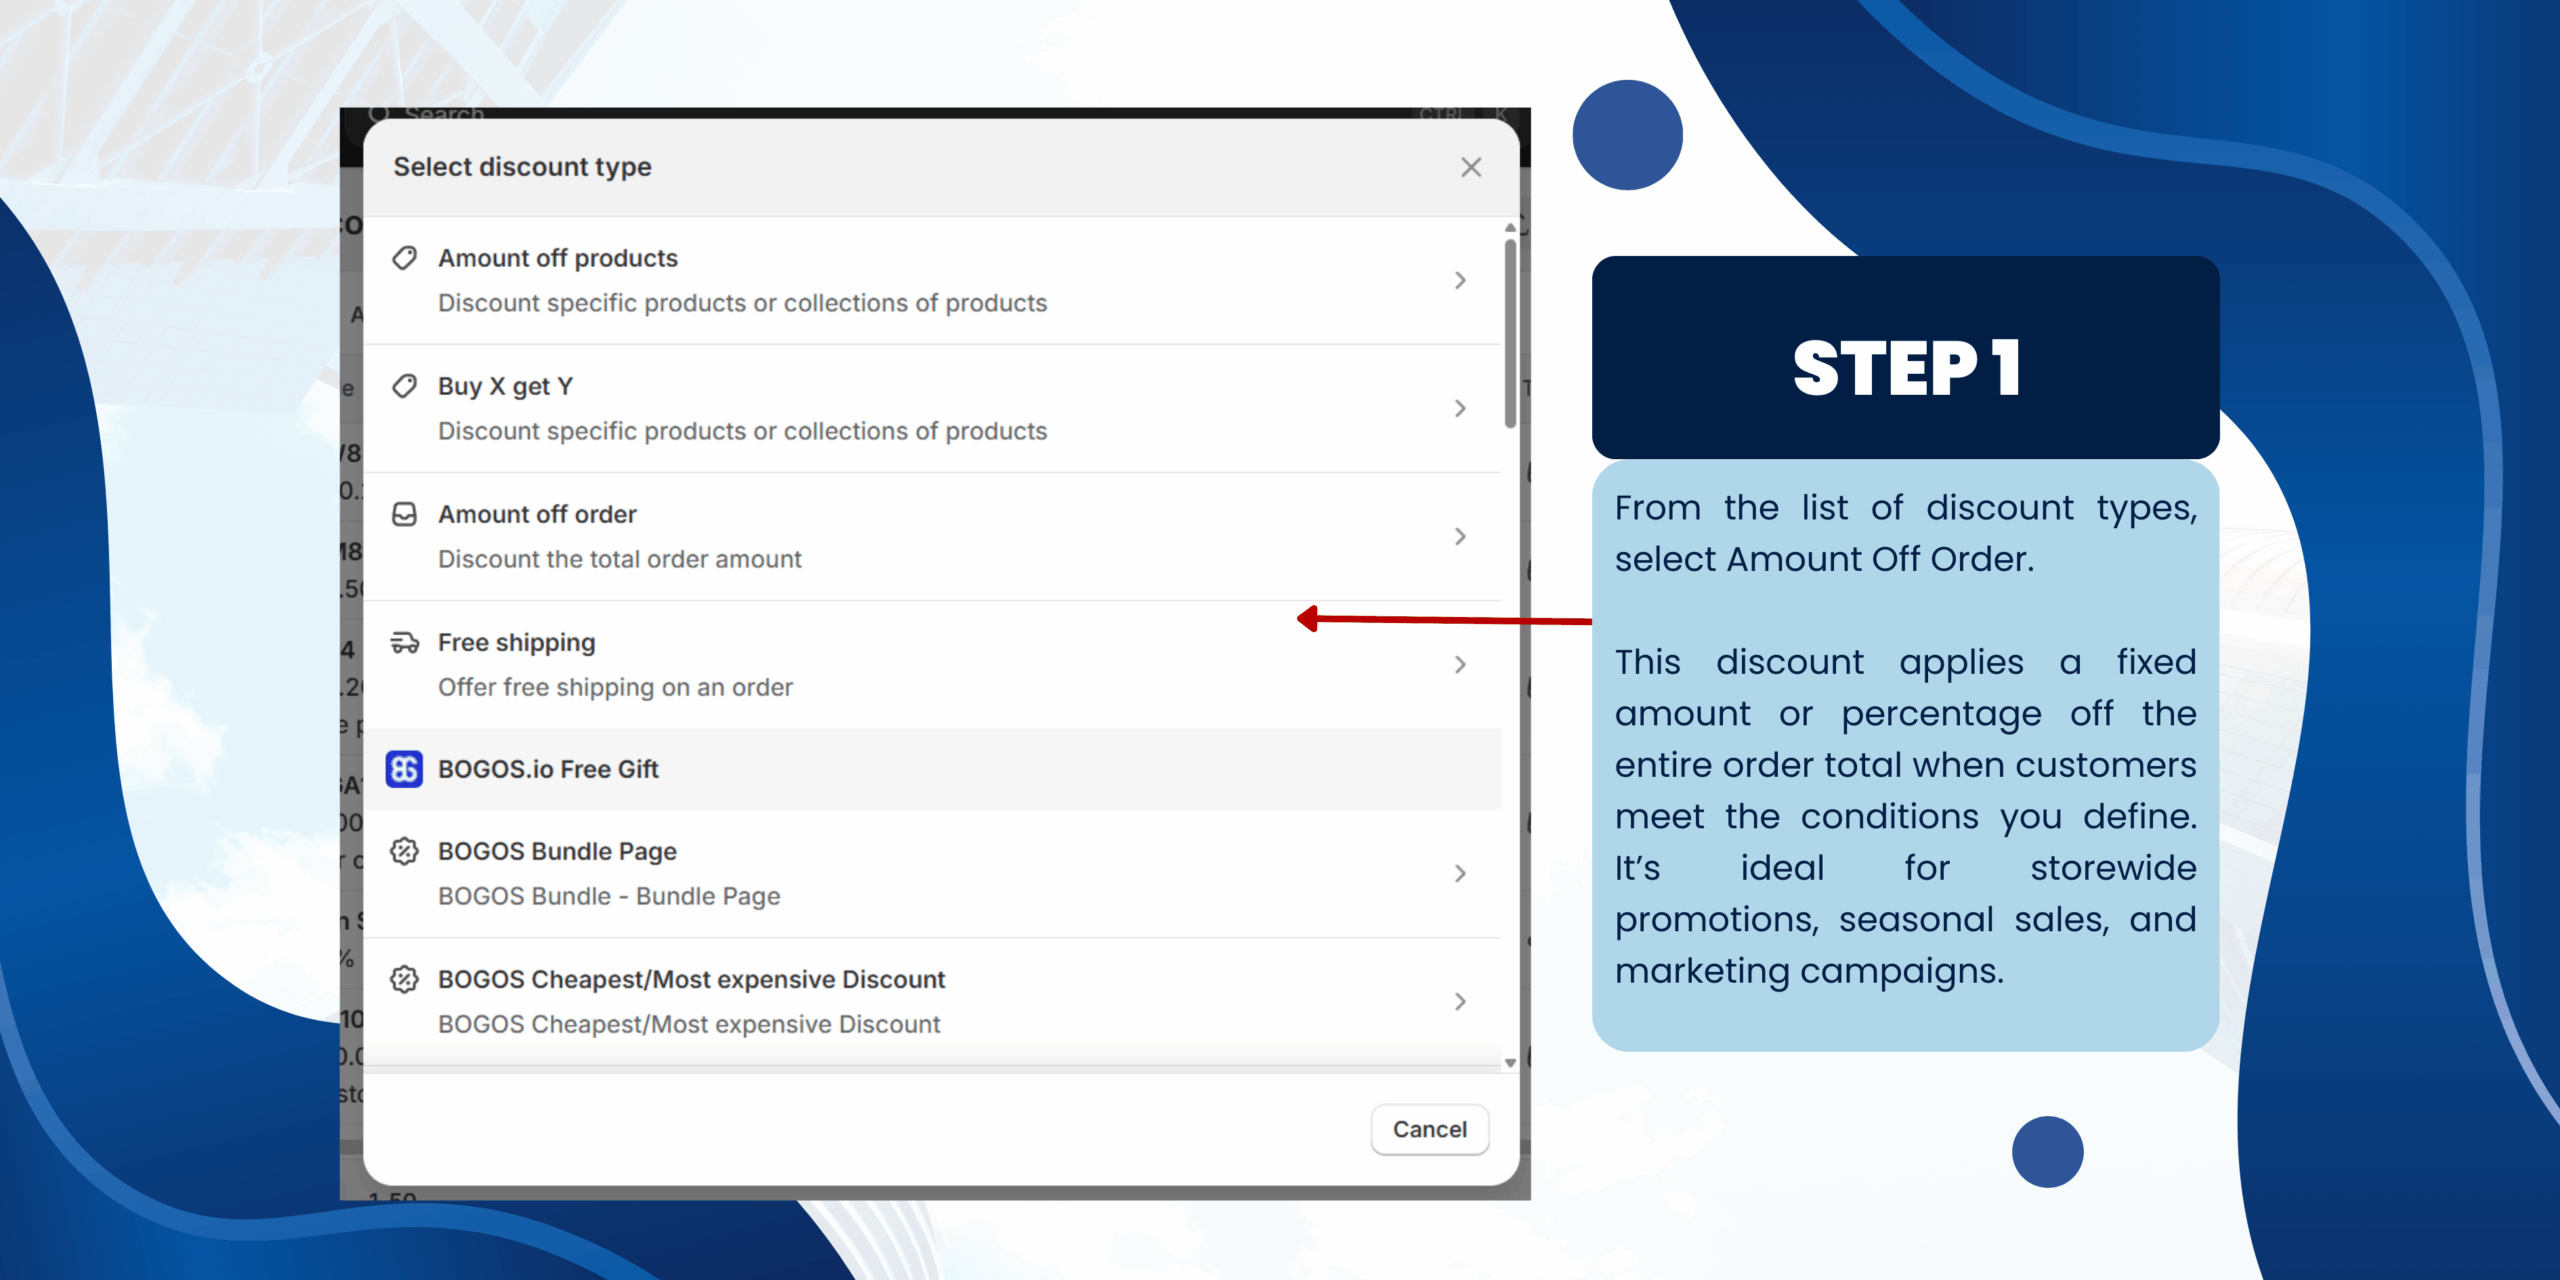
Step 1: Select Amount Off Order
From the list of discount types, select Amount Off Order.
This discount applies a fixed amount or percentage off the entire order total when customers meet the conditions you define. It’s ideal for storewide promotions, seasonal sales, and marketing campaigns.
From the list of discount types, select Amount Off Order.
This discount applies a fixed amount or percentage off the entire order total when customers meet the conditions you define. It’s ideal for storewide promotions, seasonal sales, and marketing campaigns.
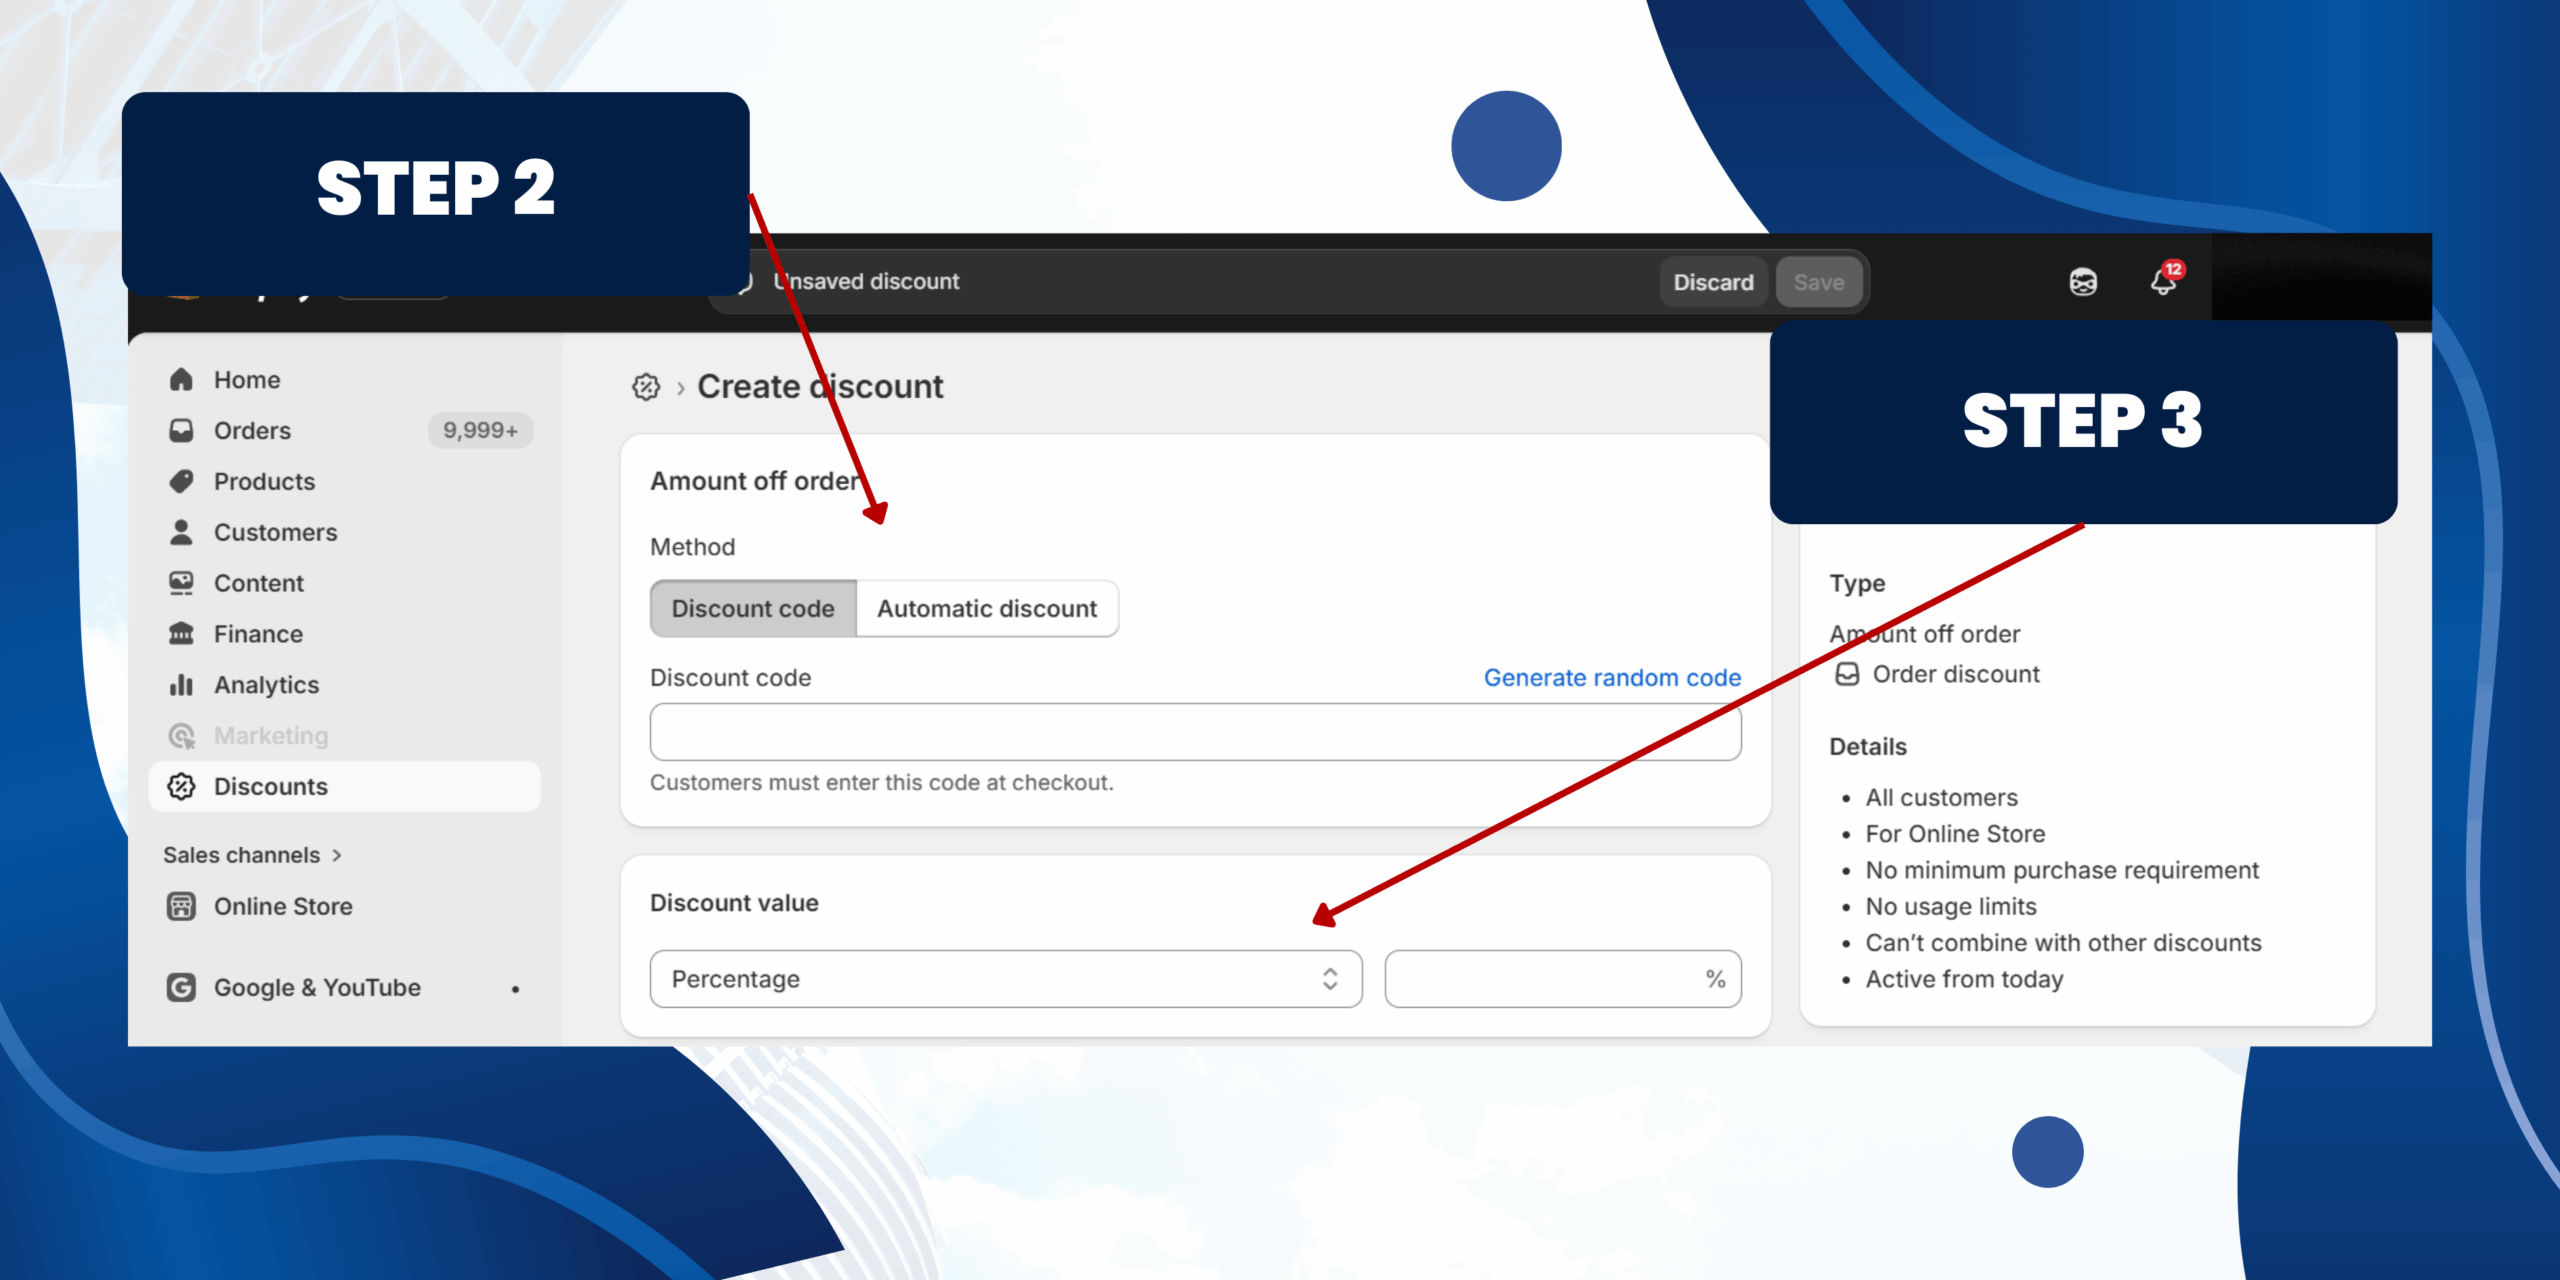
Step 2: Choose Discount Method
Discount code
• Customers must enter a code at checkout (e.g. SAVE20)
• Best for email marketing, ads, or influencer campaigns
Automatic discount
• Discount is applied automatically when conditions are met
• Best for storewide or public promotions
⚠️ Note: Shopify allows only one automatic discount active at a time.
Step 3: Set Discount Value
Choose how the discount is calculated:
Percentage
• Apply a percentage off the total order value
• Example: 10% off entire order
Choose how the discount is calculated:
Percentage
• Apply a percentage off the total order value
• Example: 10% off entire order
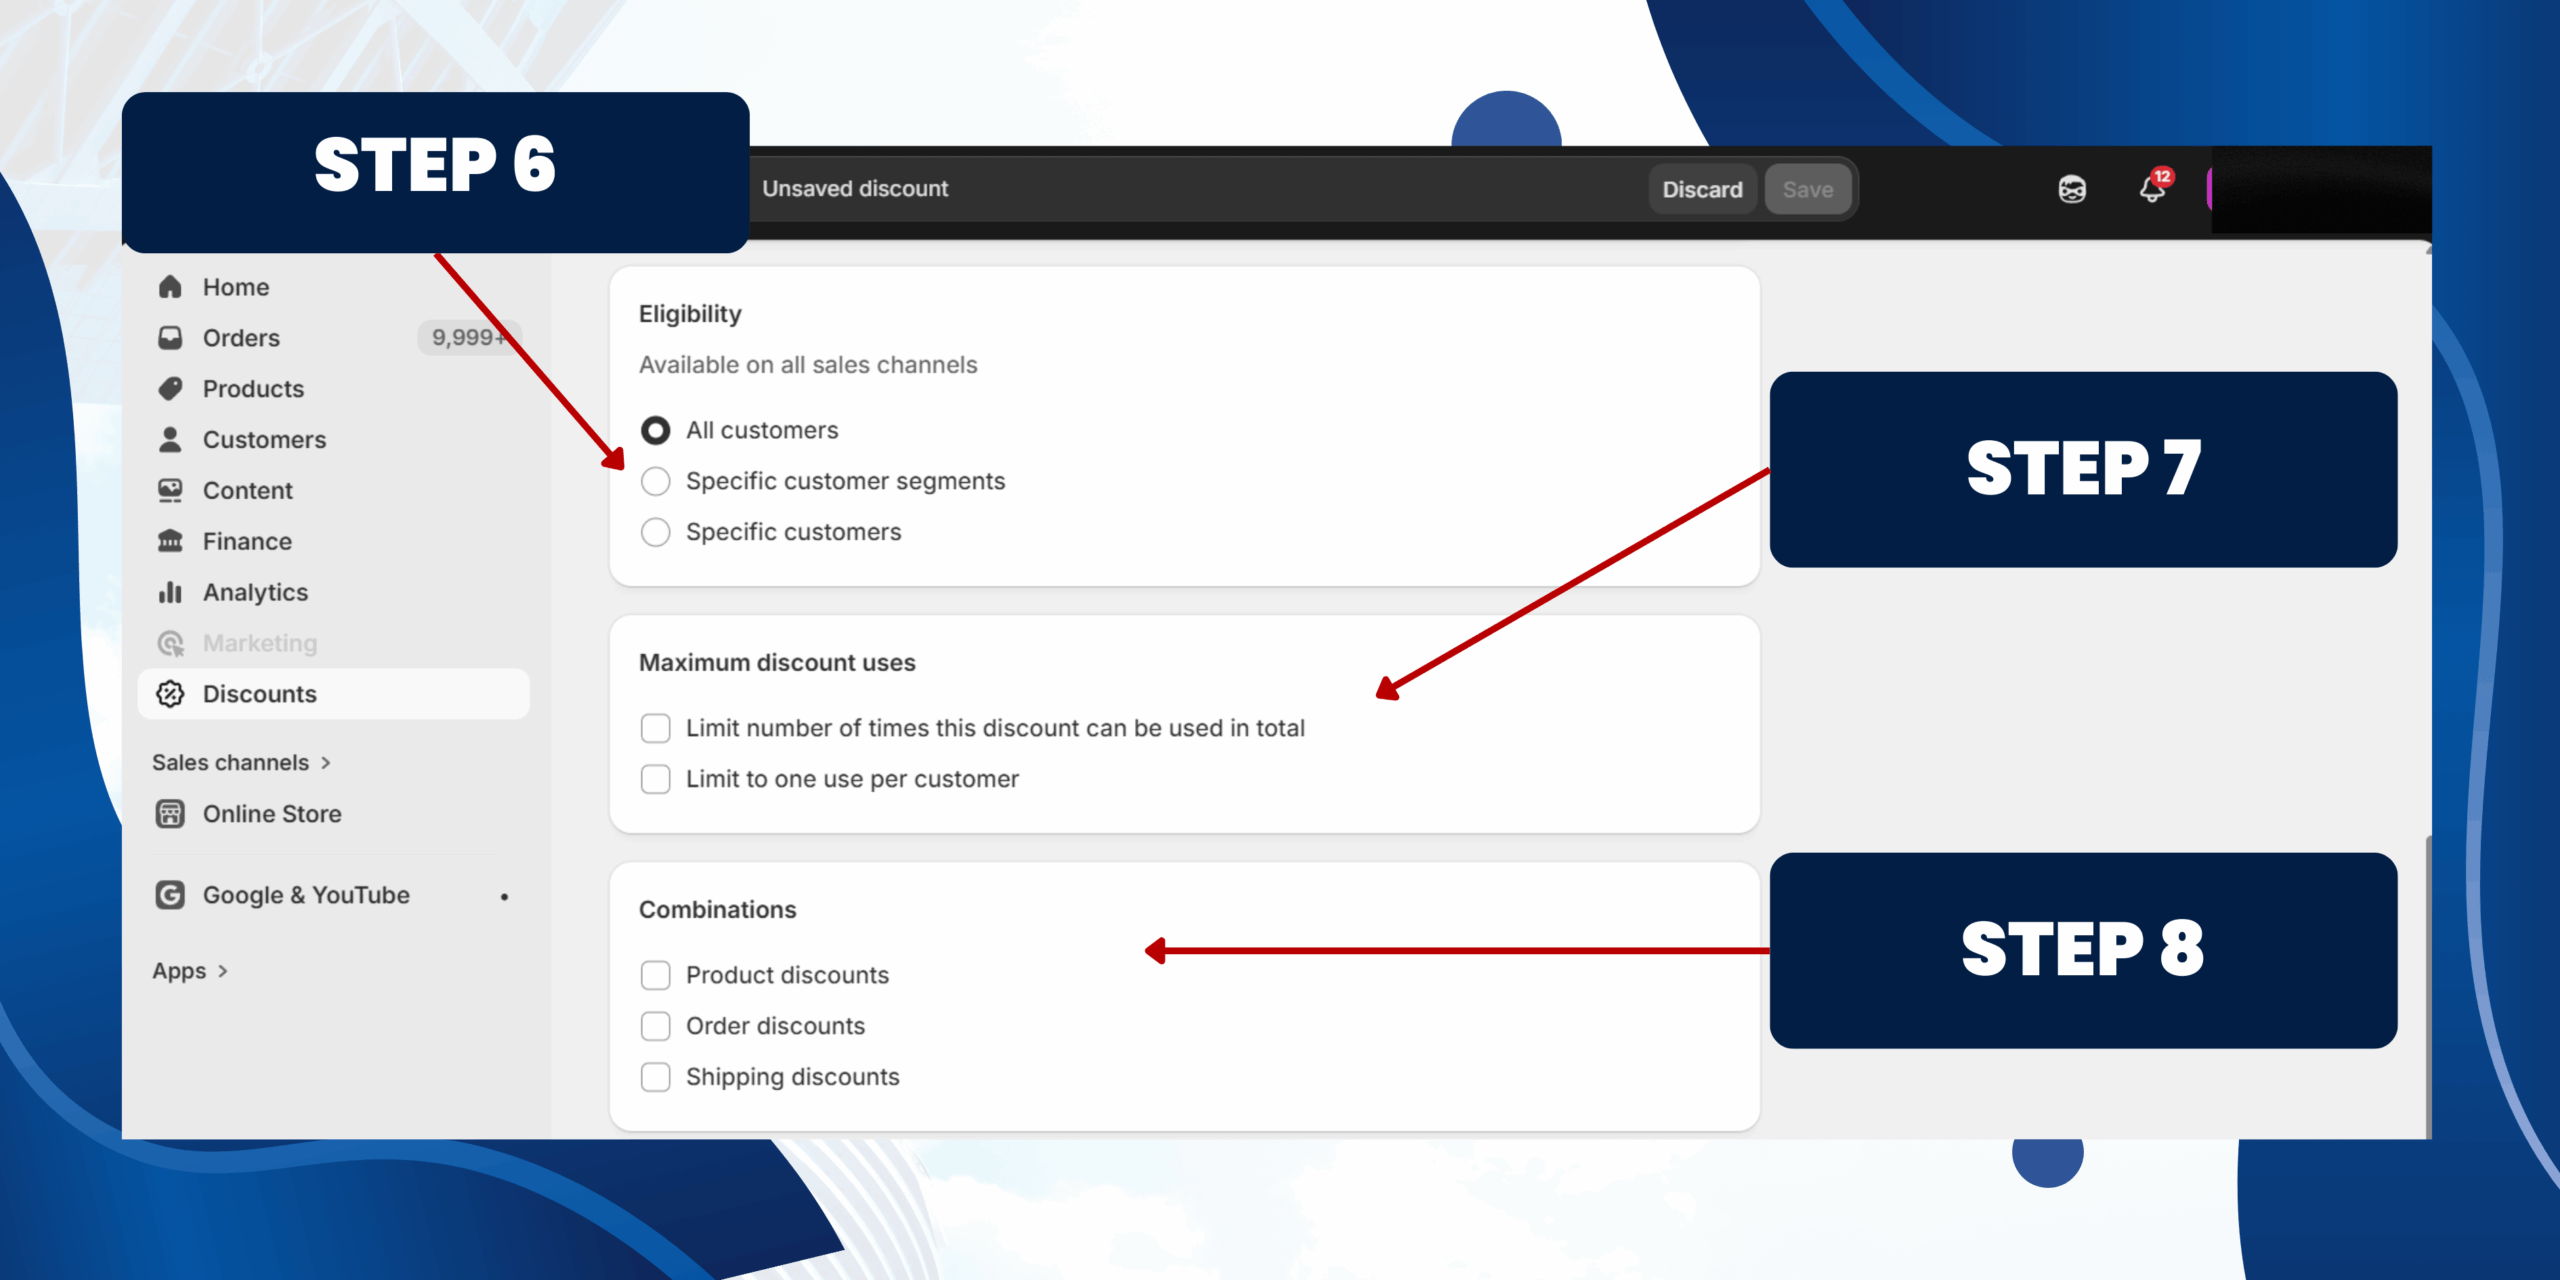
Step 4: Customer Eligibility
Choose who can use this discount:
• All customers – available to everyone
• Specific customer segments – e.g. VIP or returning customers
• Specific customers – manually selected customers only
Step 5: Minimum Purchase Requirements
Choose when the discount becomes valid:
• No minimum requirements – applies to all orders
• Minimum purchase amount – e.g. spend $100 to get the discount
• Minimum quantity of items – e.g. buy 3 items to qualify
Step 6: Maximum Discount Uses
Control how often the discount can be used:
• Limit number of times this discount can be used in total – useful for limited-time promotions
• Limit to one use per customer – prevents repeated use
Step 7: Combinations
Choose whether this discount can be combined with:
• Product discounts
• Order discounts
• Shipping discounts
💡Best practice: Disable combinations unless stacking discounts is intentional.
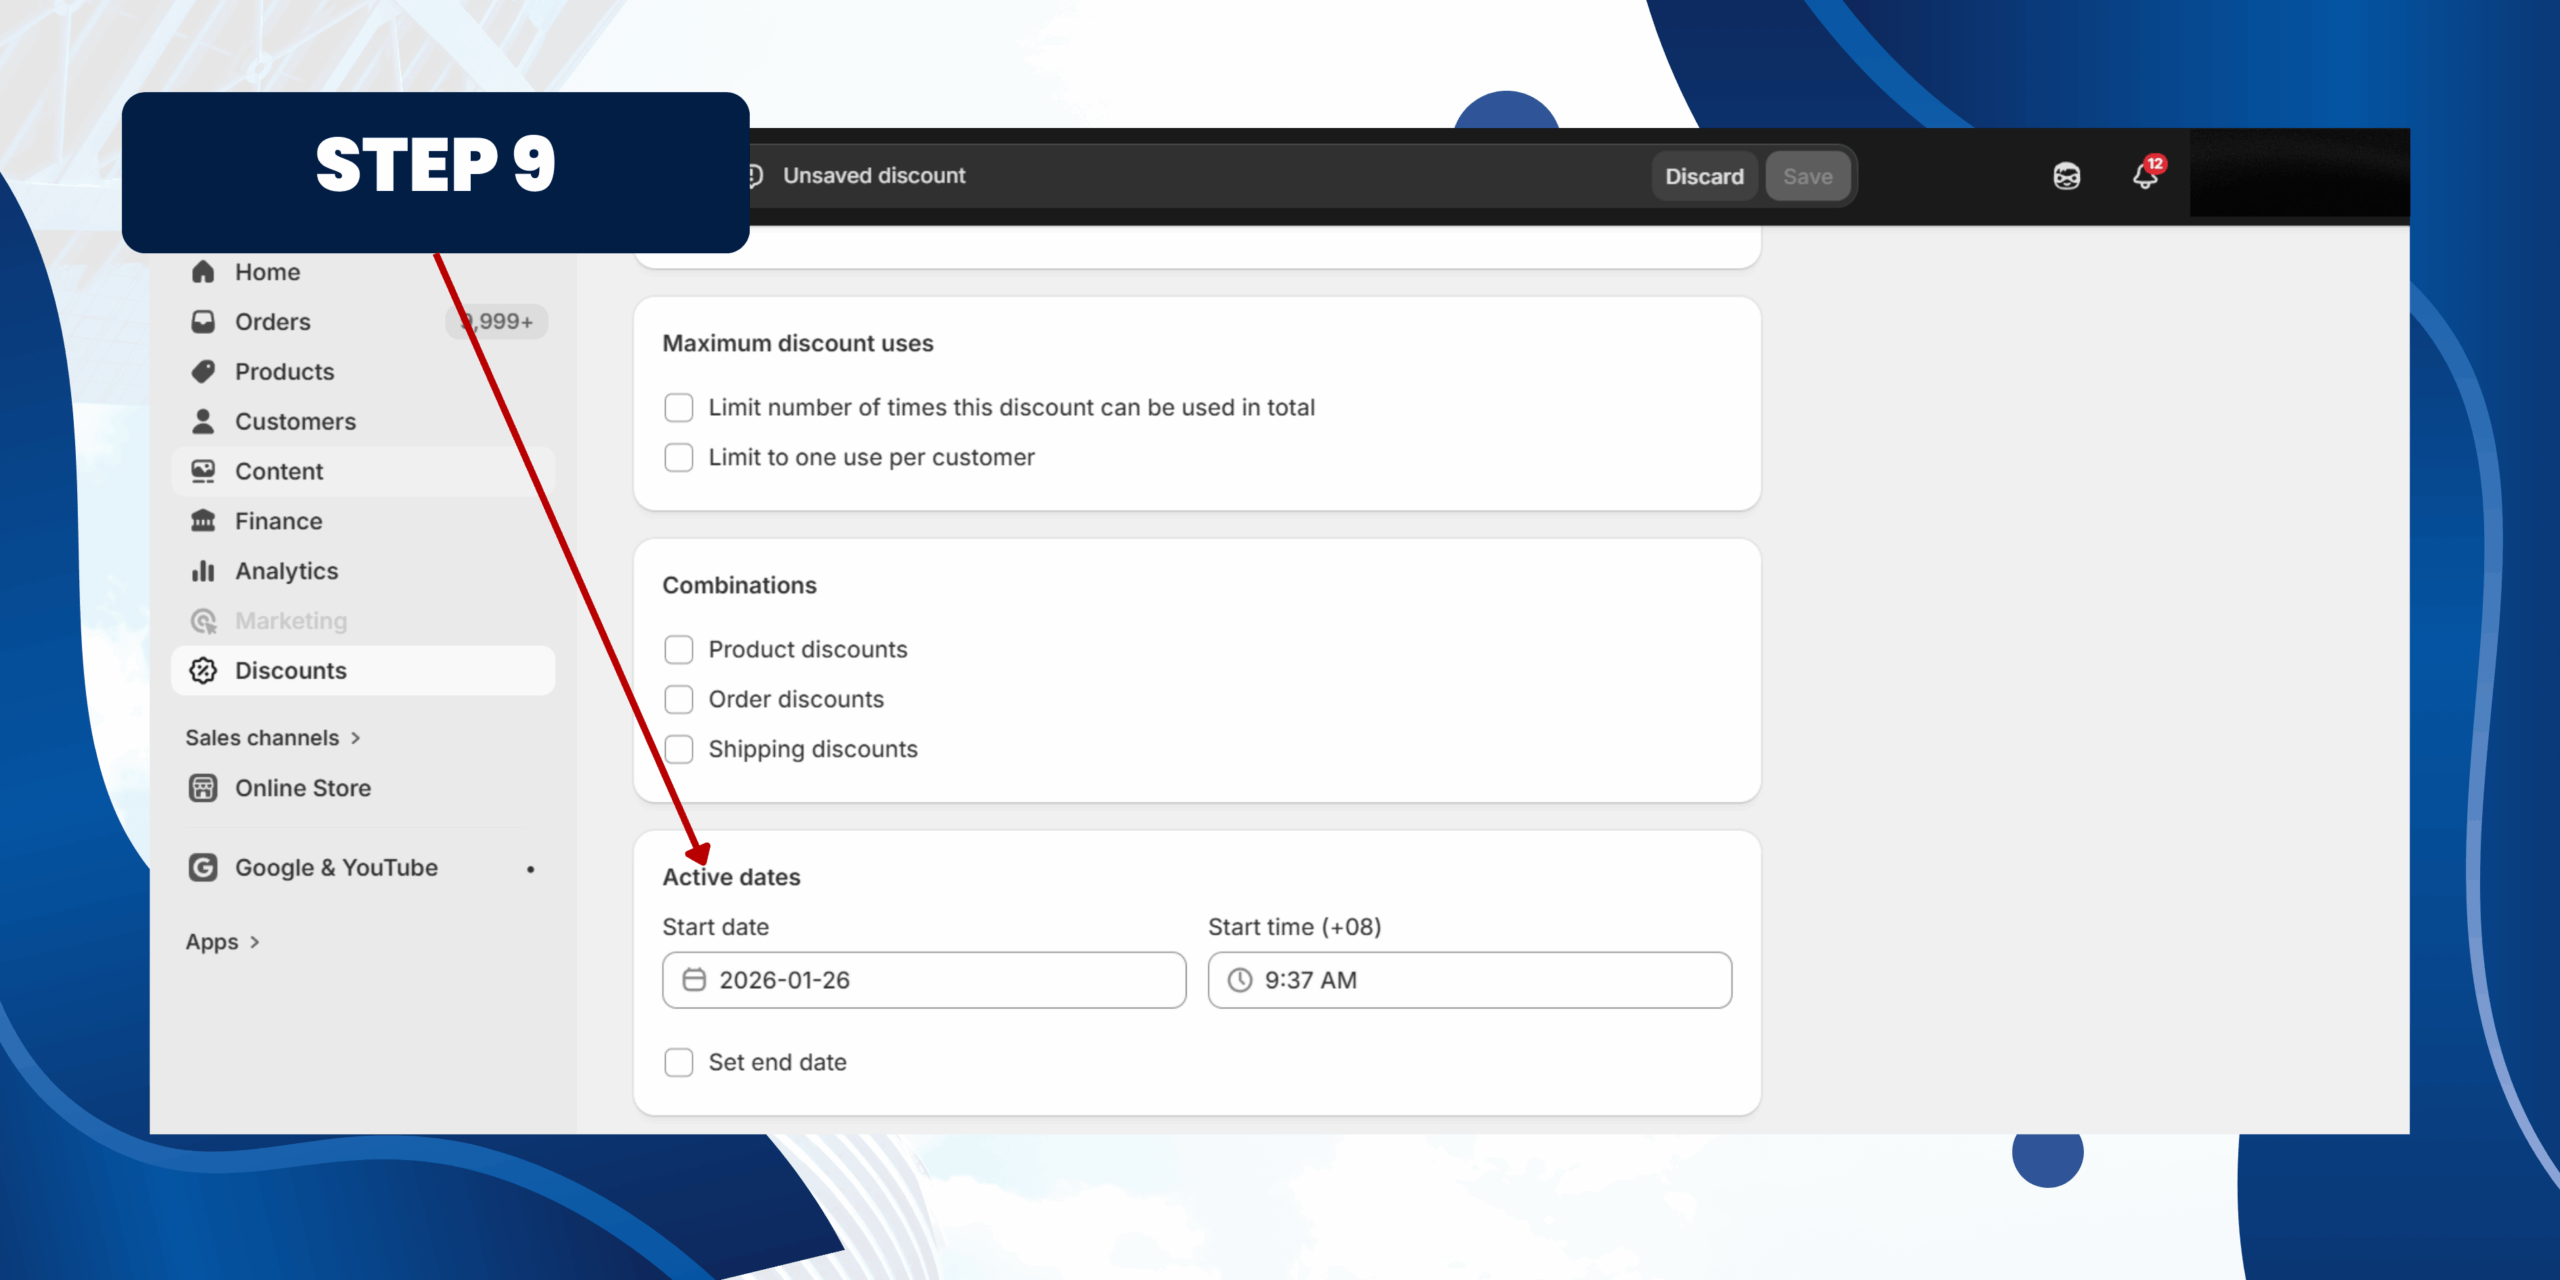
Step 8: Set Active Dates
• Select a start date and time for the discount
• Optionally enable end date to automatically stop the promotion
Step 9: Save the Discount
• Review the discount summary on the right panel
• Click Save to activate the discount
Choose whether this discount can be combined with:
• Product discounts
• Order discounts
• Shipping discounts
💡Best practice: Disable combinations unless stacking discounts is intentional.
Step 8: Set Active Dates
• Select a start date and time for the discount
• Optionally enable end date to automatically stop the promotion
Step 9: Save the Discount
• Review the discount summary on the right panel
• Click Save to activate the discount
d) Free Shipping
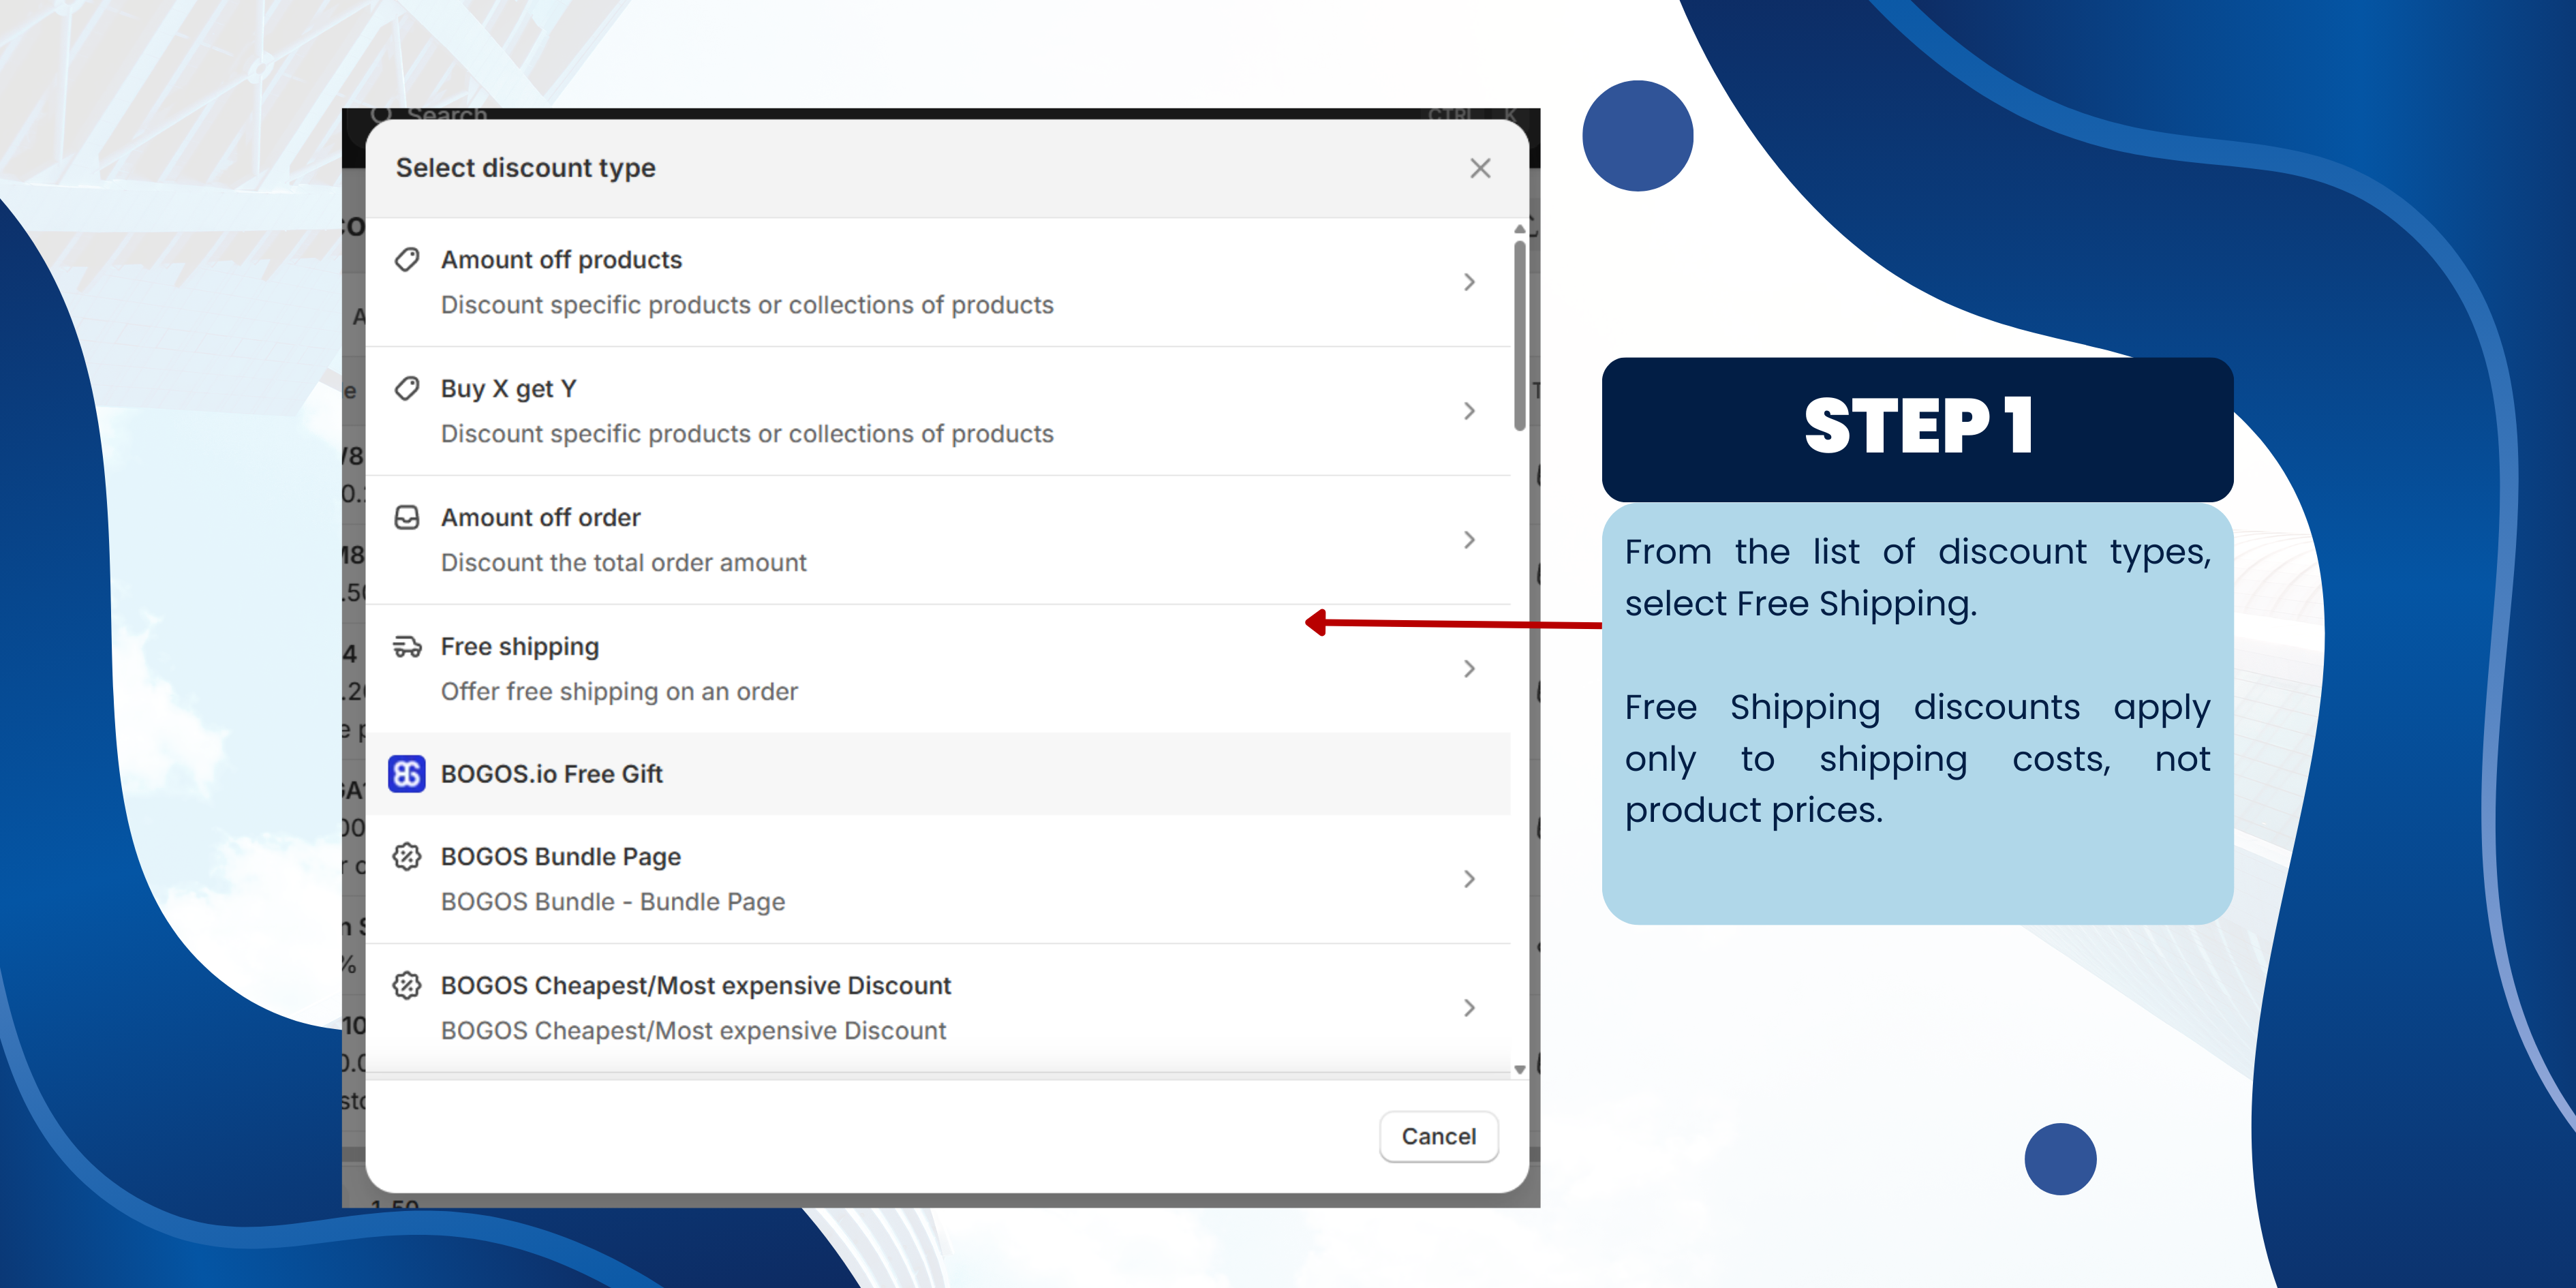
Step 1: Select Discount Type – Free Shipping
• Under Discount type, choose Free shipping
• Shopify will automatically set this as a Shipping discount
Free Shipping discounts apply only to shipping costs, not product prices.
• Under Discount type, choose Free shipping
• Shopify will automatically set this as a Shipping discount
Free Shipping discounts apply only to shipping costs, not product prices.
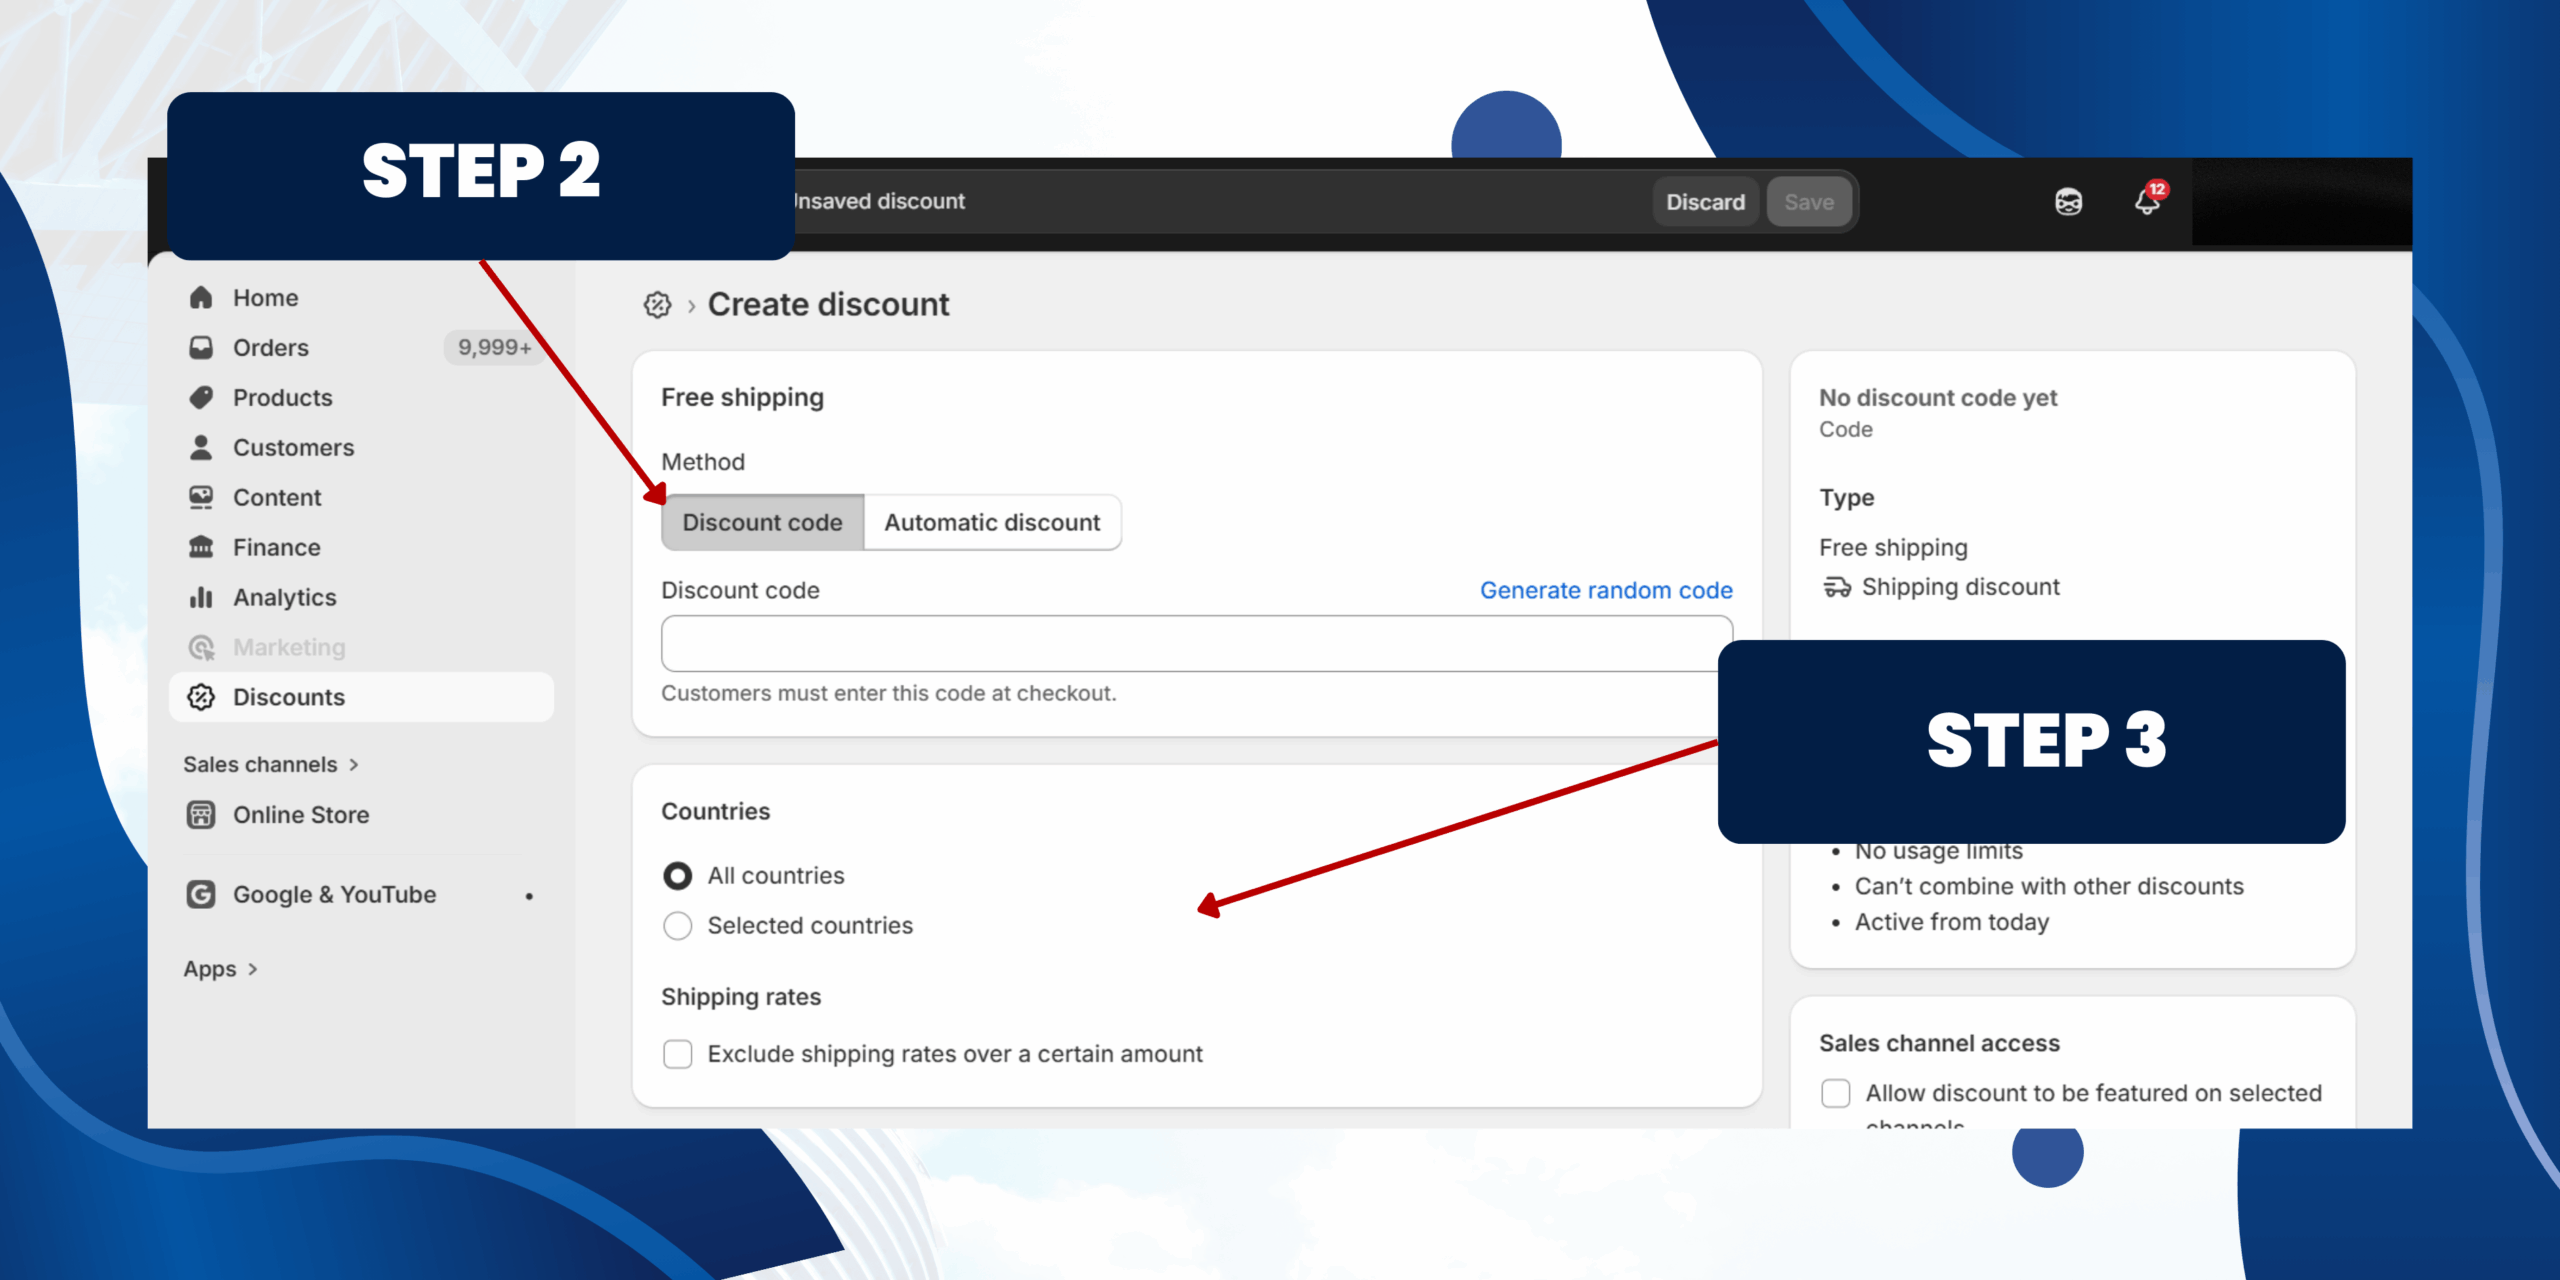
Step 2: Choose Discount Method
Discount code
• Customers must enter a code at checkout (e.g. SAVE20)
• Best for email marketing, ads, or influencer campaigns
Automatic discount
• Discount is applied automatically when conditions are met
• Best for storewide or public promotions
⚠️ Note: Automatic discounts provide a smoother checkout experience.
Step 3: Select Countries
• Choose All countries to apply free shipping worldwide
• Choose Selected countries to limit availability
• Optional: Enable Exclude shipping rates over a certain amount
This helps control costs for high-value or express shipping methods.
Step 4: Set Customer Eligibility
Under Eligibility, choose who can use the discount:
• All customers
• Specific customer segments
• Specific customers only
This allows you to target promotions effectively.
Step 5: Set Minimum Purchase Requirements
Choose one of the following options:
• No minimum requirements
• Minimum purchase amount (e.g. Free shipping on orders over $50)
• Minimum quantity of items (e.g. Buy 3 items, get free shipping)
Using a minimum requirement can increase average order value.
Step 6: Maximum Discount Uses
Control how often the discount can be used:
• Limit number of times this discount can be used in total – useful for limited-time promotions
• Limit to one use per customer – prevents repeated use
Step 7: Combinations
Choose whether this discount can be combined with:
• Product discounts
• Order discounts
• Shipping discounts
Step 8: Set Active Dates
• Choose when the discount starts
• Optional: Set an end date for limited-time campaigns
Ideal for seasonal sales and promotions.
Step 9: Save and Activate the Discount
• Click Save to activate the Free Shipping discount
Your Free Shipping promotion is now live and ready for customers.
February 16, 2026

January 27, 2026

January 19, 2026